Haier HL22XSL2 Product Manual - Page 12
Video Menu Options, Audio Menu Options
 |
UPC - 688057323886
View all Haier HL22XSL2 manuals
Add to My Manuals
Save this manual to your list of manuals |
Page 12 highlights
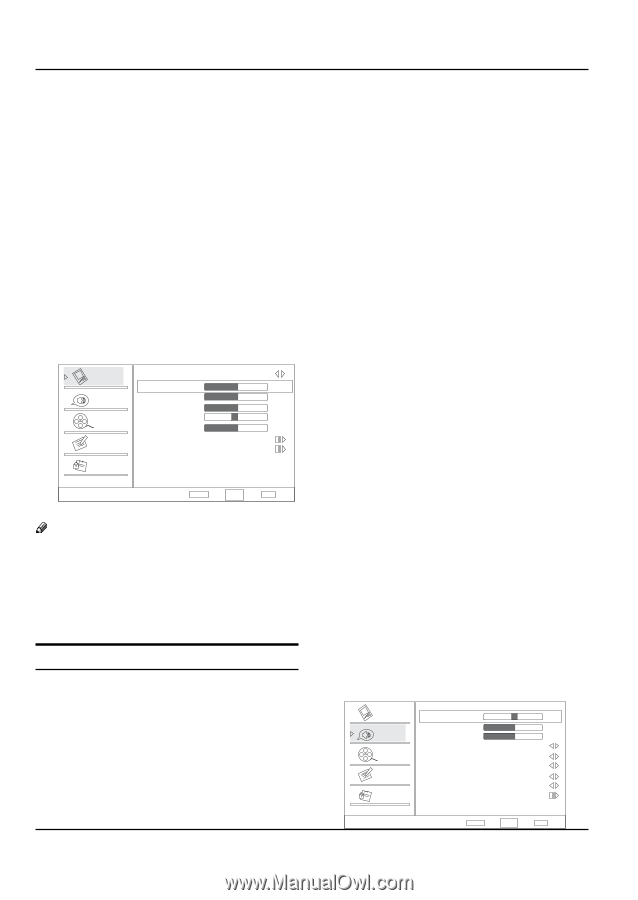
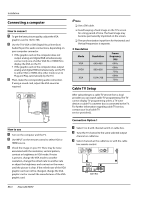
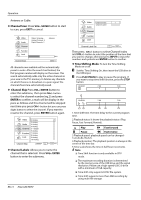
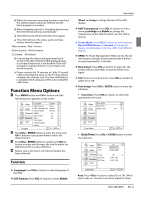
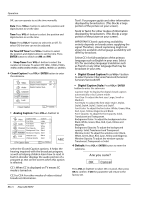
Operation Video Menu Options „„ Picture quality can be adjusted for any input separately . The picture quality on the screen can be adjusted as follows: A Press MENU button and then use CH+/- button until the Video menu appears on the screen. B Press VOL+/ ENTER button to enter the menu function and CH+/- button to scroll up and down to select the desired function. C Press VOL+/ ENTER button to confirm and VOL+/- button increase and decrease the level to adjust the selected option to your preference. D Repeat step 2 and step 3 until desired picture quality has been achieved. Video Mode Custom Brightness 50 Audio Contrast 50 Color 50 Channel Tint Sharpness 0 50 Function Color Temperature Advanced Video Lock Video ENTER Adjust CH+/VOL+/- Select EXIT Back Note RR The options may be different because of the inputs. RR Symbols on top of the menu in this manual may differ from the actual set display. RR The picture options can be changed only in Custom mode, the other modes are fixed. Function YYMode: Select the type of picture which best corresponds to your viewing requirements by selecting picture mode in Video menu. You may select the picture mode directly by pressing the PICTURE button on the remote control. YYBrightness: Press CH+/- button and VOL+/ ENTER button to confirm, then press VOL+/button to adjust the brightness of the picture. EN-11 Haier LED HDTV YYContrast: Press CH+/- button and VOL+ / ENTER button to confirm, then press VOL+/- button to adjust the contrast of the picture. YYColor: Press CH+/- button and VOL+/ ENTER button to confirm, then press VOL+/- button to adjust the color saturation. YYTint: Adjust the tone of the picture. Sharpness: Adjust the amount of the detail enhancement, the image sharpness rises as the number increases (By increasesing the level, it will show cleaner and clearer images and by descreasing the level, it will make the picture smoother). YY Color temperature: This will increase or decrease Warm(red) and Cool(blue) colors to suipersonal preferences. Select Cool to give the white colors a biue tint, Standard to give the white colors a neutral tint, Warm to give the white colors a red tint. User to allow you change the color manually. YY Advanced Video: To adjust the picture in advanced level: •• DNR: Digital Noise Reduction, to adjust to reduce the appearance of digitizing errror caused by the compressin: Medium/Strong/Auto/off/Low. •• MPEG NR: To adjust the MPEG Noise Reduction: Medium, Strong, Off or Low. •• Adaptive Luma Control: To adjust changes in the luminance of the picture: Medium, Strong, Off or Low. •• Flesh Tone: To adjust the flesh colors: High, Off, Low or Medium. •• Blue Stretch: To set Blue Stretch: On and Off. •• Game Mode: To set Game Mode: On and Off. •• Overscan: This function is active and visible in menu only when the signal is EIA timing (480i /480p /720p /1080i /1080p) in RGB color space in HDMI/DVI input. Audio Menu Options Sound can be adjusted for any input as follows: A Press MENU button and then CH+/- button until the following menu appears on the screen. Video Balance 0 Bass 50 Audio Treble 50 SRS TS XT On Channel Equalizer Off Speaker Off Function SPDIF Type Off AVL Off Lock Audio Only Audio ENTER Adjust CH+/VOL+/- Select EXIT Back
-
 1
1 -
2
-
3
-
4
-
5
-
6
-
 7
7 -
 8
8 -
 9
9 -
 10
10 -
 11
11 -
 12
12 -
 13
13 -
 14
14 -
 15
15 -
 16
16 -
 17
17 -
18
-
19
-
20
-
21
-
22
-
23
 |
 |