Haier LT26M1CA User Manual - Page 7
Tuning Menu Options, Antenna Connection - no picture
 |
View all Haier LT26M1CA manuals
Add to My Manuals
Save this manual to your list of manuals |
Page 7 highlights
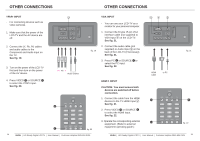
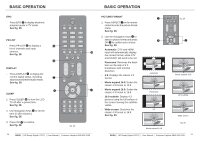
ANTENNA CONNECTION TUNING MENU OPTIONS WARNING: - Switch off the TV before connecting any external device. CONNECTING THE ANTENNA 1. Connect the Antenna Plug to the Antenna Input Q located at the rear of the TV. See fig. 9. 2. For optimum picture quality, adjust the direction of the antenna. TURN ON THE LCD-TV 1. When the POWER J or A is pressed the TV will turn on and the fig. 9 Power LED A on the front of the TV will change from red to blue See fig. 10 and 11. 2. When the LCD-TV is turned off using the POWER J or A , the LCD-TV will go into standby mode and the Power LED A will turn A red. See fig. 10 and 11. J fig. 10 A 3. To improve picture quality where the signal is poor use a signal amplifier (not included). X Q FIRST TIME INSTALLATION fig. 11 AC POWER CORD CONNECTION NOTE: Make sure your local voltage is 230V/240V~, 50Hz. 1. Connect the AC Power Cord Z to the Power Connector X . See fig. 9. 2. Connect the AC Power Cord Z to the mains socket. See fig. 9. 1. This display will appear on the screen when the TV is turned on for the first time. See fig. 12. NOTE: If you can not find this screen press MENU U . Then use the Natvigation Keys Y to select the TV menu. See fig. 11. Mains Socket Z Antenna Plug 2. Press the Green Button a to proceed with the installation. See fig. 11. U Y a Thank you for your purchase of this TV. Please proceed with the following steps to set-up your TV. Next fig. 12 10 BUSH HD Ready Digital LCDTV User Manual Customer Helpline 0845 604 0105 BUSH HD Ready Digital LCDTV User Manual Customer Helpline 0845 604 0105 11
-
 1
1 -
 2
2 -
 3
3 -
 4
4 -
 5
5 -
 6
6 -
 7
7 -
 8
8 -
 9
9 -
 10
10 -
 11
11 -
 12
12 -
13
-
14
-
15
-
16
-
17
-
18
-
19
-
20
-
21
-
22
-
23
 |
 |
