Haier XQB40-F Use and Care Guide - Page 3
circumstances
 |
View all Haier XQB40-F manuals
Add to My Manuals
Save this manual to your list of manuals |
Page 3 highlights
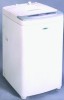
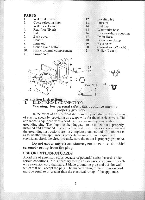
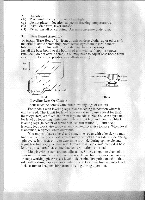
PARTS 1. Water inlet valve 2. Cycle selection knob 3. Water level knob 4. Rear foot (fixed) 5. Lid 6. Back cover 7. Handle 8. Inner tub 9. Gentle cycle button 10. Fabric softener compartment 11. Power cord 12. Leveling leg 13. Pulsator 14. Lint trap 15. Water inlet hose 16. Faucet-to-hose coupling 17. Drain Hose 18. Drain hose clamp 19. Base board 20. Castor-Front (2 each) 21. Roller (2 each) 2 1 9 15 5 3 .-16 20 10 14 4 /e l 13 6 19 7 Goose Neck 21 .... ire 12 8 17 .....;sip 18 Installation Instructions 1. ELECTRICAL CONNECTION Warning: For personal safety, this appliance must be properly grounded. In the event of an electrical short circuit, grounding reduces the risk of electric shock by providing an escape wire for the electric current. This appliance is equipped with a cord having a grounding wire with a grounding plug. The plug must be plugged into an outlet that is properly installed and grounded. Consult a qualified electrician or service center if the grounding instructions are not completely understood. If doubt exists as to weather the appliance is properly grounded, have a qualified. electrician check the circuit to make sure the outlet is properly grounded. Do not under any circumstances, cut or remove the third (ground) prong from the plug. USE OF EXTENSION CORDS Avoid use of extension cords because of potential safety hazards under certain conditions. If it is necesary to use an extension cord, use only a 3wire extension cord that has a 3-blade grounding plug and a 3 slot wall outlet that will accept the plug. The marked rating of the extension cord must be equal to or greater than the electrical rating of the appliance. 2
-
 1
1 -
 2
2 -
 3
3 -
 4
4 -
 5
5 -
 6
6 -
 7
7 -
 8
8 -
 9
9 -
10
-
11
 |
 |
