Haier XQB40-F Use and Care Guide - Page 4
scratching.
 |
View all Haier XQB40-F manuals
Add to My Manuals
Save this manual to your list of manuals |
Page 4 highlights
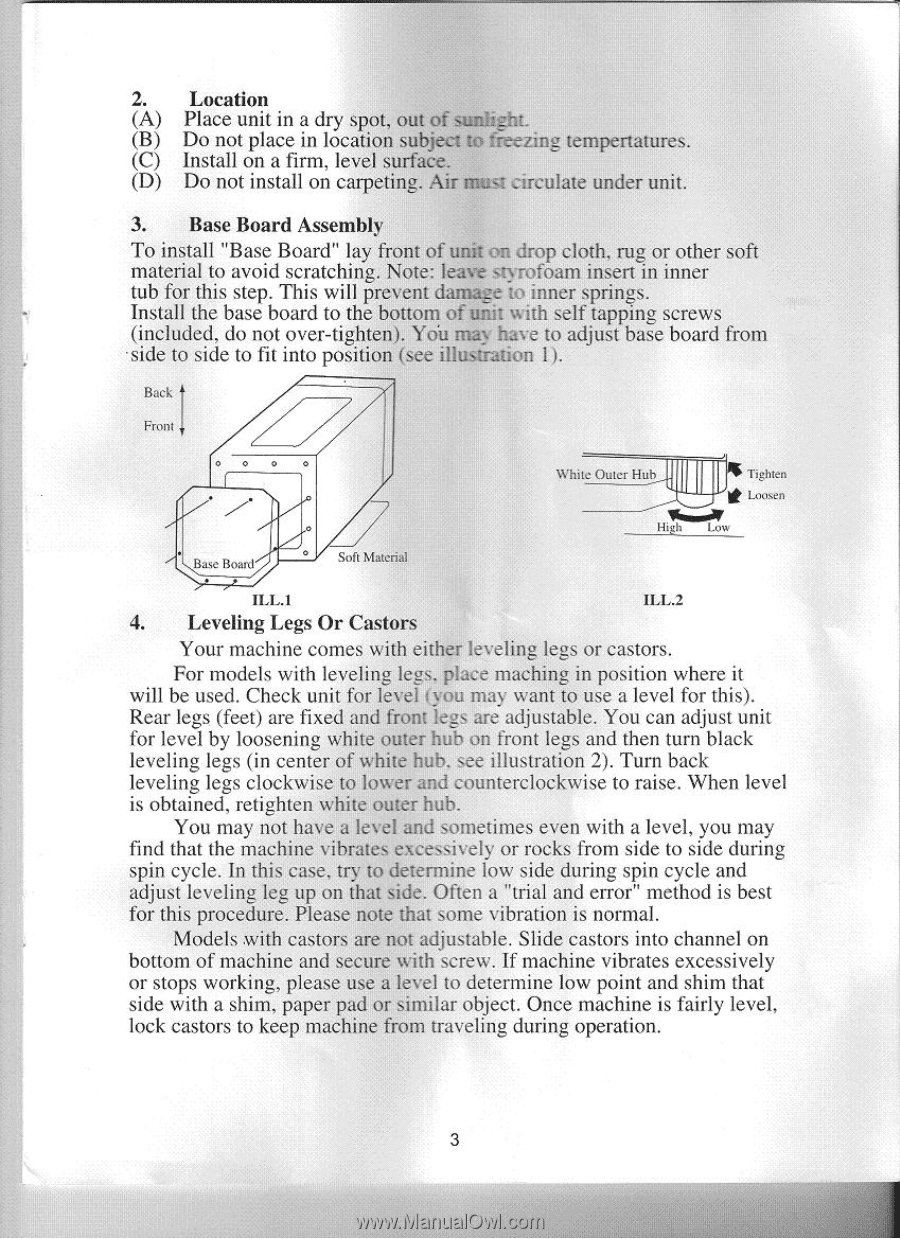
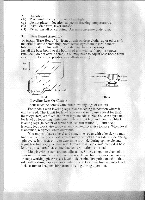
=4H1 111 rnM hit (4: IIR 2. Location (A) Place unit in a dry spot, out of sunlight. (B) Do not place in location subject to freezing tempertatures. (C) Install on a firm, level surface. (D) Do not install on carpeting. Air must circulate under unit. 3. Base Board Assembly To install "Base Board" lay front of unit on drop cloth, rug or other soft material to avoid scratching. Note: leave styrofoain insert in inner tub for this step. This will prevent damage to inner springs. Install the base board to the bottom of unit with self tapping screws (included, do not over-tighten). Yon may have to adjust base board from side to side to fit into position (see illustration U. Back Front 0 0 0 O Base Board Soft ?dam-jai White Outer Huh Tighten Loosen C" High I ow ILL.1 ILL.2 4. Leveling Legs Or Castors Your machine comes with either leveling legs or castors. For models with leveling legs. place maching in position where it will be used. Check unit for level (you may want to use a level for this). Rear legs (feet) are fixed and front legs are adjustable. You can adjust unit for level by loosening white outer hub on front legs and then turn black leveling legs (in center of white hub. see illustration 2). Turn back leveling legs clockwise to lower and counterclockwise to raise. When level is obtained, retighten white outer huh. You may not have a level and sometimes even with a level, you may find that the machine vibrates excessively or rocks from side to side during spin cycle. In this case, try to determine low side during spin cycle and adjust leveling leg up on that side. Often a "trial and error" method is best for this procedure. Please note that some vibration is normal. Models with castors are not adjustable. Slide castors into channel on bottom of machine and secure with screw. If machine vibrates excessively or stops working, please use a level to determine low point and shim that side with a shim, paper pad or similar object. Once machine is fairly level, lock castors to keep machine from traveling during operation. 3 I4 a
-
 1
1 -
 2
2 -
 3
3 -
 4
4 -
 5
5 -
 6
6 -
 7
7 -
 8
8 -
 9
9 -
 10
10 -
11
 |
 |