Hamilton Beach 990 Operation Manual - Page 8
Cleaning, Instructionscontinued
 |
UPC - 040094019908
View all Hamilton Beach 990 manuals
Add to My Manuals
Save this manual to your list of manuals |
Page 8 highlights
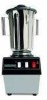
Caring for the Blender CleaningInstructions(continued) Removing and cleaning the cutter assembly Periodically remove the cutter assembly from the container and clean it as follows: 1.Turn the container upside down. 2. Remove the PVC cap from the center of the clutch. 3. Hold the tool (provided) over the drive clutch as shown. Then insert an Allen wrench (not includ- z ed) into the center hole of the tool and then into the cutter assembly shaft. Turn the Allen wrench counterclockwise to loosen the drive clutch. 4. Remove the drive clutch by turning it clockwise. 5. Position tool engaging pins into the holes in the locking nut. Loosen the nut by turning it /0 clockwise. Remove the container collar and large gasket. AWARNING Electrical Shock Hazard Disconnect power before cleaning. Replace all parts before operating. Failure to do so can result in death or electrical shock. Tool aU PVC cap Clutch Nut Container collar Large gasket 6. Carefully remove the cutter assembly from the inside of the container. Container Remove the small gasket from the cutter assembly. Small gasket NOTE: Do not disassemble the cutter I- assembly. Cutter 7. Carefully wash all parts in hot, soapy assembly water. Handle carefully since the blades are sharp. Dry the assembly. 8. If container/cutter is broken, replace immediately; Do not use. 8
-
 1
1 -
2
-
 3
3 -
 4
4 -
 5
5 -
 6
6 -
 7
7 -
 8
8 -
 9
9 -
 10
10 -
 11
11 -
 12
12 -
 13
13 -
14
-
15
-
16
-
17
-
18
-
19
-
20
-
21
-
22
-
23
-
24
-
25
-
26
-
27
-
28
-
29
-
30
-
31
-
32
-
33
-
34
 |
 |
