Harman Kardon AVR 140 Owners Manual - Page 39
Programmed Device Functions
 |
View all Harman Kardon AVR 140 manuals
Add to My Manuals
Save this manual to your list of manuals |
Page 39 highlights
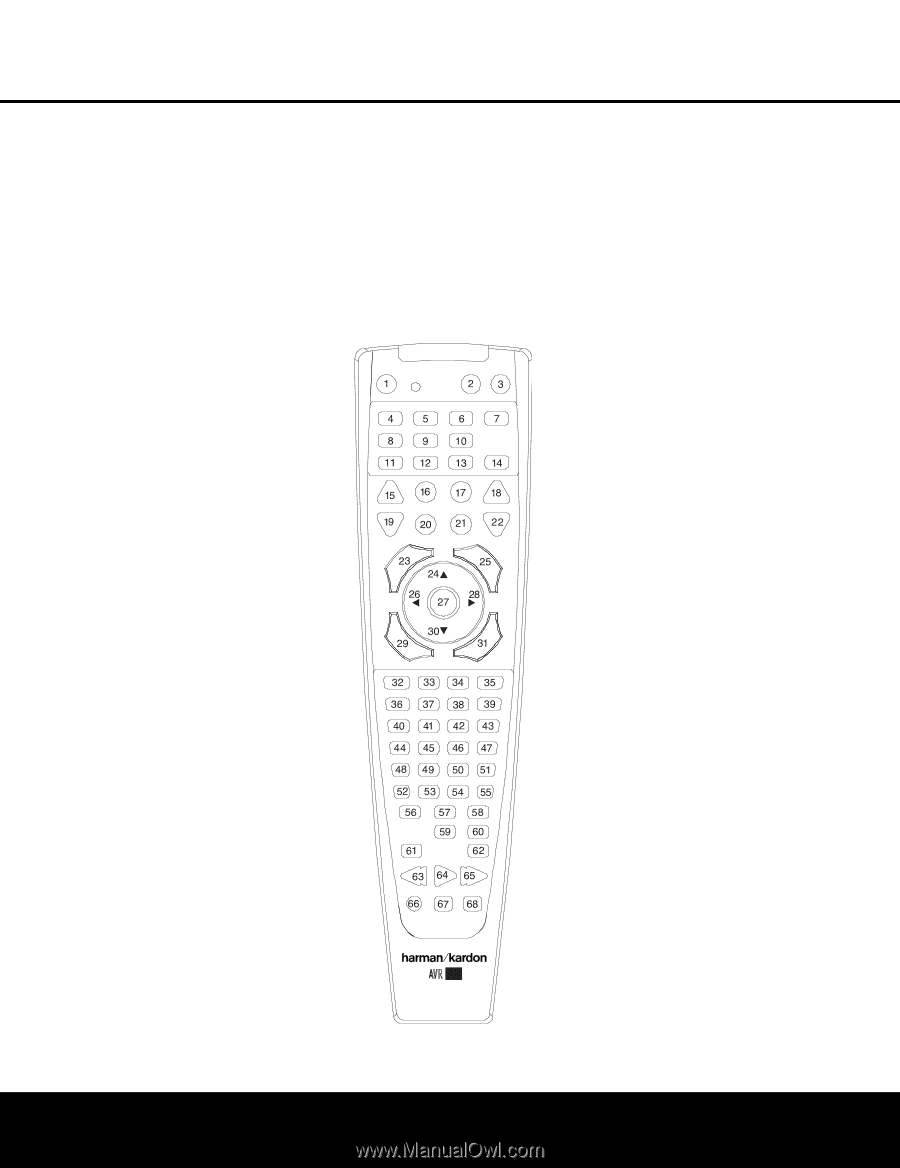
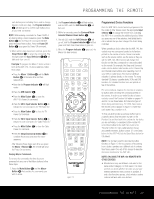
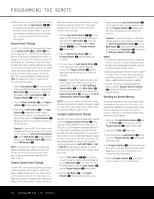
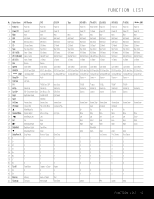
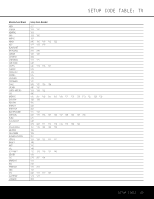
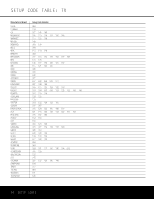
PROGRAMMING THE REMOTE each button press, including those used to change devices, counts as a step. The Program Indicator c will flash green to confirm each button press as you enter commands. NOTE: While entering commands for Power On/Off of any device during a macro sequence, press the Mute Button f for the Power On command. DO NOT press the actual Power button. Press the Power Off Button 0 to program the Power Off command. 3. When all the steps have been entered, press the Sleep Button j to enter the commands. The red light under the Input Selectors ef will blink and then turn off. Example: To program the Macro 1 button so that it turns on the AVR 140, TV and a cable box, follow these steps: • Press the Macro 1 Button T and the Mute Button f at the same time and then release them. • Note that the Program Indicator c will flash amber. • Press the AVR Selector f. • Press the Mute Button f to store the AVR 140's Power On command. • Press the VID 3 Input Selector Button e to indicate the next command is for "TV Power On." • Press the Mute Button f to store the TV Power On Command. • Press the VID 2 Input Selector Button e to indicate the next command is for "Cable Power On." • Press the Mute Button f to store the Cable Power On command. • Press the Sleep/Channel Up Button j to complete the process and store the macro sequence. After following these steps, each time you press the Macro 1 Button T, the remote will send the Power On command. Erasing Macro Commands To remove the commands that have been programmed into any one of the Macro buttons, follow these steps: 1. Press the Mute Button f and the Macro Button T that contains the commands you wish to erase. 2. The Program Indicator c will flash amber, and the LED under the AVR Selector f will turn red. 3. Within ten seconds, press the Surround Mode Selector/Channel Down Button k. 4. The red LED under the AVR Selector f will go out, and the Program Indicator c will turn green and flash three times before it goes out. 5. When the Program Indicator c goes out, the Macro has been erased. ® 140 Figure 13 Programmed Device Functions Once the AVR 140's remote has been programmed for the codes of other devices, press the appropriate Input Selector e to change the remote from controlling the AVR 140 to controlling the additional product. When you press any one of the selectors, it will briefly flash in red to indicate that you have changed the device being controlled. When operating a device other than the AVR 140, the controls may not correspond exactly to the function printed on the remote or button. Some commands, such as the volume control, are the same as they are with the AVR 140. Other buttons will change their function so that they correspond to a secondary label on the remote. For example, the Sleep and Surround mode selector buttons also function as the Channel Up and Channel Down buttons when operating most TV sets, VCRs or cable boxes. The Channel Up/Down indication is printed directly on the remote. For many standard CD players, cassette decks, VCRs and DVD functions, the standard function icons are printed on top of the buttons. For some products, however, the function of a particular button does not follow the command printed on the remote. In order to see which function a button controls, consult the Function List tables on pages 41 and 42. To use those tables, first check the type of device being controlled (e.g., TV, VCR). Next, look at the remote control diagram in Figure 13. Note that each button has a number on it. To find out what function a particular button has for a specific device, find the button number on the Function List and then look in the column for the device you are controlling. For example, button number 45 is the Direct button for the AVR 140, but it is the "Favorite" button for many cable television boxes and satellite receivers. Button number 31 is the Delay button for the AVR 140, but the Open/Close button for CD players. NOTE: The numbers used to describe the button functions in Figure 13 for the purposes of describing how a button operates are a different set of numbers than those used in the rest of this manual to describe the button functions for the AVR 140. NOTES ON USING THE AVR 140 REMOTE WITH OTHER DEVICES: • Manufacturers may use different code sets for the same product category. For that reason, it is important that you check whether the code set you have entered operates as many controls as possible. If only a few functions operate, check whether another code set will work with more buttons. PROGRAMMING THE REMOTE 39
-
 1
1 -
2
-
3
-
4
-
5
-
6
-
7
-
8
-
9
-
10
-
11
-
12
-
13
-
14
-
15
-
16
-
17
-
18
-
19
-
20
-
21
-
22
-
23
-
24
-
25
-
26
-
27
-
28
-
29
-
30
-
31
-
32
-
33
-
 34
34 -
 35
35 -
 36
36 -
 37
37 -
 38
38 -
 39
39 -
 40
40 -
 41
41 -
 42
42 -
 43
43 -
 44
44 -
45
-
46
-
47
-
48
-
49
-
50
-
51
-
52
-
53
-
54
-
55
-
56
-
57
-
58
-
59
-
60
 |
 |