Harman Kardon AVR80 Owners Manual - Page 9
How to Connect a Plug
 |
View all Harman Kardon AVR80 manuals
Add to My Manuals
Save this manual to your list of manuals |
Page 9 highlights
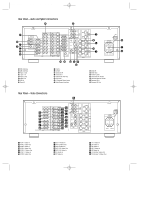
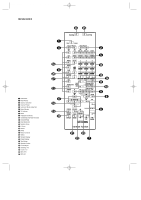
AVR80 manual 11/01/98 13:01 Side 3 Safety Information 3 ENGLISH Unpacking and Installation The carton and shipping materials used to protect your new receiver during shipment were specially designed to cushion it from shock and vibration. We suggest that you save the carton and packing materials for use in shipping if you move or should the unit ever need repair. To minimize the size of the carton in storage, you may wish to flatten it. This is done by carefully slitting the tape seams on the bottom and collapsing the carton down to a more two dimensional appearance. Other cardboard inserts may be stored in the same manner. Packing materials that cannot be collapsed should be saved along with the carton in a plastic bag. If you do not wish to save the packaging materials, please note that the carton and other sections of the shipping protection are recyclable. Please respect the environment and discard those materials at a local recycling center. Important Fuse and Plug Information This apparatus is fitted with an approved moulded 13 Amp plug. To change a fuse in this type of plug proceed as follows: 1. Remove fuse cover and fuse. 2. Fix new fuse which should be a BS1362 5A A.S.T.A. or BSI approved type. 3. Refit the fuse cover. If the fitted plug is not suitable for your socket outlets, it should be cut off and an appropriate plug fitted in its place. If the mains plug contains a fuse, this should have a value of 5A. If a plug without a fuse is used, the fuse at the distribution board should not be greater than 5A. NOTE: The severed plug must be destroyed to avoid a possible shock hazard should it be inserted into a 13A socket elsewhere. How to Connect a Plug The wires in the mains lead are coloured in accordance with the following code: BLUE - "NEUTRAL" ("N") BROWN - "LIVE" ("L") 1. The BLUE wire must be connected to the terminal which is marked with the letter "N" or coloured BLACK. 2. The BROWN wire must be connected to the terminal which is marked with the letter "L" or coloured RED. 3. Do not connect either wires to the earth terminal in the plug which is marked my the letter "E" or by the safety earth symbol or coloured green or greenand-yellow. Before replacing the plug cover, make certain that the cord grip is clamped over the sheath of the lead - not simply over the two wires. Conventions In order to help you use this manual with the remote control, front panel controls, rear panel connections and on-screen menus, certain conventions have been used. EXAMPLE - (bold type) indicates a specific remote control or front panel button, or rear panel connection jack EXAMPLE - (OCR type) indicates a message that is visible through the onscreen menu system 1 - (number in a square) indicates a specific front panel control ¡ - (number in a circle) indicates an indicator in the main front panel display a - (number in an oval) indicates a button or indicator on the remote å - (letter in a circle) indicates a rear panel Audio or System connection A - (letter in a square) indicates a specific rear panel video connection
-
 1
1 -
2
-
3
-
 4
4 -
 5
5 -
 6
6 -
 7
7 -
 8
8 -
 9
9 -
 10
10 -
 11
11 -
 12
12 -
 13
13 -
 14
14 -
15
-
16
-
17
-
18
-
19
-
20
-
21
-
22
-
23
-
24
-
25
-
26
-
27
-
28
-
29
-
30
-
31
-
32
-
33
-
34
-
35
-
36
-
37
-
38
-
39
-
40
-
41
-
42
 |
 |
