Harman Kardon CD191 Owners Manual - Page 6
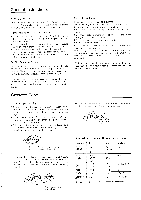
Components, Their, Functions, ®INPUT
 |
View all Harman Kardon CD191 manuals
Add to My Manuals
Save this manual to your list of manuals |
Page 6 highlights
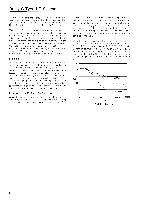
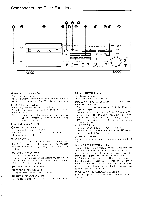
Components and Their Functions El SENOUST NERO UNIPLANE TRANSPORT OLTPAWIDESANO LINEAR ,IASE CASSETTE °EON PO P PEC PAUSE 'PI • • o I haman karclon CD191 • -o-u" a-.c a- t, MICROPHONES 115 eee640640 e HEADPHONES JACK (HEADPHONES) For connection of stereo headphones. ip REWIND BUTTON (44REW) For rewinding of a tape at a high speed. Rewind time is about 90 sec. with C-60 tape. e FAST FORWARD BUTTON (F.FWD•*) For fast forwarding of a tape. Fast forward time is about 90 sec. with C-60 tape. m TAPE SELECTORS (BIAS/EQUALIZATION) For selection of the record and playback circuitry that provides the lowest distortion and flattest frequency response for METAL, CrO2 or LN tape. e RECORD BUTTON (REC•) To record a tape, press this button and the PLAY button at the same time. The red RECORD INDICATOR illuminates to indicate that a recording is being made. A RECORD STANDBY mode can be activated by pressing the RECORD button and the PAUSE button at the same time. The red RECORD and yellow PAUSE INDICATORS illuminate. This mode is useful for making input level adjustments prior to recording. To change from the RECORD STANDBY mode to the RECORD mode, press the PLAY button. To cancel the RECORD STANDBY mode, press the STOP button. ID PAUSE BUTTON (PAUSE II ) For temporarily stopping playback or recording. Also, press this button with the RECORD button to activate the RECORD STANDBY mode. ®AUTOMATIC REPEAT BUTTON (auto repeat) When this button is depressed, the cassette deck wil l continuously rewind and replay one side of the tape. e BIAS FINE TRIM KNOB (bias fine trim) For precise adjustment of the bias used during recording. See section "Adjustment of the Bias Fine Trim Knob." e INPUT BALANCE CONTROL (input balance) For control of input level balance between the right and left channels. Set the knob at the 12 o'clock position for normal operation. Use this feature to restore the input level balance when the levels of the right and left channels are extremely different or to del iberately upset the input level balance as you l ike. Turn this knob clockwise, and the recording level of left channel is decreased. Turn counterclockwise, and the recording level of right channel is decreased. e INPUT SELECTOR (input selector) For selection of the input source for recording. LINE position: For recording from other components. M IC position: For recording from microphones. ®INPUT LEVEL CONTROL (INPUT LEVEL) For input level control during recording. The LED LEVEL DISPLAY shows the input level. See "Tape Recording" section for detailed instructions on adjustment of this control. e MICROPHONE JACKS (MICROPHONES) For connection of recording microphones. Use low-impedance microphones. 5
-
 1
1 -
 2
2 -
 3
3 -
 4
4 -
 5
5 -
 6
6 -
 7
7 -
 8
8 -
 9
9 -
 10
10 -
 11
11
 |
 |
