Harman Kardon CD191 Owners Manual - Page 8
Operation, Procedures
 |
View all Harman Kardon CD191 manuals
Add to My Manuals
Save this manual to your list of manuals |
Page 8 highlights
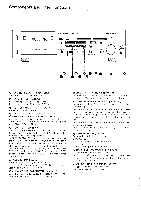
Operation Procedures Tape Playback 1. Turn on your amplifier, turn the volume control to the minimum level and select the tape monitor function on the amplifier according to its owner's manual. 2. Press the POWER switch, and the POWER INDICATOR i l luminates. 3. Press the EJECT button to open the CASSETTE COMPARTMENT door, and insert the recorded cassette tape correctly in the compartment. Incorrect insertion may cause a malfunction in door closing or playback. 4. Press the TAPE SELECTOR button corresponding to the type of tape being used. 5. Press the DOLBY NR ON/OFF selector for a tape recorded using the Dolby NR system. Select the B or C NA type by the NR TYPE selector. 6. Press the PLAY button and tape playback will begin. 7. Turn the volume control of the amplifier to a desired level . 8. Press the PAUSE button for temporary stopping of the tape. Press the PLAY button to restart tape playback. 9. Press the STOP button to stop tape playback. 0. Tape playback automatically stops when the end of the tape is reached. Automatic Repeat System The automatic repeat system is convenient for automatic repeated playback from the beginning of a tape to the end. Depress the AUTO REPEAT button. When the end of the tape is reached, the tape is automatically rewound to the beginning, and is automatically replayed endlessly. This automatic repeat mode is cancel led by releasing the AUTO REPEAT button. Tape Recording 1. Turn on the POWER switch. The POWER INDICATOR illuminates. 2. Press the EJECT button to open the CASSETTE COMPARTMENT door and insert a cassette tape correctly. Incorrect insertion may cause a malfunction in door closing or recording. 3. Press the TAPE SELECTOR button corresponding to the type of tape being used. 4. To record with the Dolby NR system, depress the NR ON/OFF selector and select the B or C type by operating the NR TYPE selector. Check the selected type by the DOLBY NR INDICATOR. The "B" TYPE INDICATOR il luminates in green color, and the "C" TYPE INDICATOR in yellow. 5. To record an FM stereo broadcasting program with the Dolby NR system, be sure that the MPX FILTER switch is on. This switch is off when depressed. 6. Press the RESET button to reset the TAPE COUNTER indication to "000". 7. Place the INPUT SELECTOR to the LINE position. 8. Press the RECORD and PAUSE buttons at the same time. The RECORD and PAUSE INDICATORS il luminate. The tape does not run in this state. 9. Turn the INPUT LEVEL control to set the proper recording level and set the INPUT BALANCE control to the 12 o'clock position. 10. Press the PLAY button to start recording and the PAUSE INDICATOR will go out. 11. Press the PUASE button for temporarily stopping the tape. Press the PLAY button to restart recording. 12. Press the STOP button to stop recording. 13. Tape recording automatically stops when the end of the tape is reached. The record mode is cancelled, also. Recording through microphones Connect the left and right microphone cords correctly to MICROPHONE jacks. Press the INPUT SELECTOR to the MIC position and turn the INPUT LEVEL control to set the proper input level . Recording from a turntable Press the subsonic filter on your amplifier as required. Dubbing without using an amplifier Connect this unit as shown in "Connection to Another Tape Deck for Dubbing", and carry out dubbing operation. 7
-
 1
1 -
2
-
 3
3 -
 4
4 -
 5
5 -
 6
6 -
 7
7 -
 8
8 -
 9
9 -
 10
10 -
 11
11
 |
 |
