Hayward LPWUS11030 ColorLogic-CrystaLogic-Installation-Operation-Manual-092467 - Page 6
Mounting the Hayward Universal ColorLogic/CrystaLogic LED Light into Hayward Niche LFGUY1000
 |
View all Hayward LPWUS11030 manuals
Add to My Manuals
Save this manual to your list of manuals |
Page 6 highlights
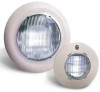
Mounting the Hayward Universal ColorLogic/CrystaLogic LED Light into Hayward Niche LFGUY1000 NOTE: Be sure that the trim ring is detached from light before attempting to install. Turn trim ring counter clockwise to detach. You may have to gently use a screwdriver in one of the 4 slots (located at 1,5,7 and 11 o'clock) to help turn the trim ring. The Universal ColorLogic/CrystaLogic Light offers a unique tool-less design when used with the LFGUY1000 niche. To prepare for installation, remove the mounting screw and spacer from the top of the light (this will not be needed) and verify that the Twist Lock Latch is installed (Figure 1). The latch is removable and extras are included with the niche. The Twist Lock Latch will allow the light to fasten to the LFGUY1000 niche without the need for tools. Coil up 3-4ft of extra cord (up to 15ft can be coiled if necessary) and insert it in the LFGUY1000 niche. To mount the light, insert it into the niche with the mounting hole located at the 11 o'clock position. Twist the light fixture clockwise until it firmly locks. The mounting hole should now be at the 12 o'clock position (Figure 2). Install the trim ring by positioning the HAYWARD logo at the 11 o'clock position onto the light fixture. Twist the trim ring clockwise until it firmly locks. The Hayward logo should now be in the 12 o'clock position (Figure 3). To remove the Universal ColorLogic/CrystaLogic LED Light from the LFGUY1000 Niche: Remove the trim ring by turning it counter clockwise. If removal is difficult, carefully insert a flat head screwdriver in one of the four front slots to help rotate the trim ring. With the trim ring removed, insert a #2 phillips head or any small screwdriver into the access hole as show below (Figure 4). Pushing straight into the hole will release the lock, allowing you to rotate the light counter clockwise. Remove the screwdriver and continue to rotate the light until it can be removed from the light fixture. Figure 1 Figure 2 Figure 3 6 Figure 4 USE ONLY HAYWARD GENUINE REPLACEMENT PARTS
-
 1
1 -
 2
2 -
 3
3 -
 4
4 -
 5
5 -
 6
6 -
 7
7 -
 8
8 -
 9
9 -
 10
10 -
 11
11 -
 12
12 -
13
-
14
-
15
-
16
-
17
-
18
-
19
-
20
-
21
-
22
-
23
-
24
-
25
-
26
-
27
-
28
-
29
-
30
-
31
-
32
 |
 |
