Hayward LPWUS11030 ColorLogic-CrystaLogic-Installation-Operation-Manual-092467 - Page 7
Mounting the Hayward Universal ColorLogic/CrystaLogic LED Light to other Niches
 |
View all Hayward LPWUS11030 manuals
Add to My Manuals
Save this manual to your list of manuals |
Page 7 highlights
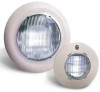
Mounting the Hayward Universal ColorLogic/CrystaLogic LED Light to other Niches The Hayward Universal ColorLogic/CrystaLogic light is designed to install in virtually all niches. Refer to the chart below for a list of compatible niches and check the Hayward website for the very latest compatibility information. In the interest of improving our products, if you find a niche that we have not listed or if you find that our list is inaccurate, please contact Hayward and provide feedback. We will send you a small gift in exchange for your time. NOTE: You may need additional installation instructions on page 8. Before starting the installation, remove the trim ring from the light fixture by holding the light fixture firmly and rotating the outer trim ring counterclockwise until it detaches. Note that the light comes with the removable Twist Lock Latch factory installed for mounting into a Hayward niche LTGUY1000. In most cases, the latch will not interfere with other installations. If you find that the latch prevents the installation in your niche, remove it by pulling it off of the two pins. The Universal ColorLogic/CrystaLogic lights have multiple screw and clip positions to fit most every niche. With the trim ring removed, coil up the extra cord and insert it in the niche behind the light fixture. To mount the light fixture, position the fixture with the mounting screw at the top (12 o'clock position). Insert the bottom hook of the light into the niche (6 o'clock position), then pivot the top of the fixture up and secure it with the mounting screw. Be sure the hook on the bottom catches on the niche. Install the trim ring by rotating it clockwise until it locks. When removing the fixture from the niche, remove the trim ring, unscrew the mounting screw, tilt the top of the fixture out, and lift it up and out. 7 USE ONLY HAYWARD GENUINE REPLACEMENT PARTS
-
 1
1 -
 2
2 -
 3
3 -
 4
4 -
 5
5 -
 6
6 -
 7
7 -
 8
8 -
 9
9 -
 10
10 -
 11
11 -
 12
12 -
13
-
14
-
15
-
16
-
17
-
18
-
19
-
20
-
21
-
22
-
23
-
24
-
25
-
26
-
27
-
28
-
29
-
30
-
31
-
32
 |
 |
