HealthRider E660 Instruction Manual - Page 10
How To Use The Elliptical Crosstrainer, Caution
 |
View all HealthRider E660 manuals
Add to My Manuals
Save this manual to your list of manuals |
Page 10 highlights
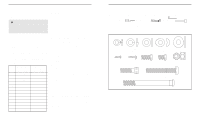
HOW TO USE THE ELLIPTICAL CROSSTRAINER PLUGGING IN THE POWER CORD FEATURES OF THE CONSOLE Plug the power cord into a power converter (included). The displays and various indicators on the console will light and a tone will sound. Note: To decrease the possibility of damaging your machine, always use a surge protector. Each time the power cord is plugged in, the incline frame will move to the lowest position. In addition, the incline frame may automatically move up and down as the elliptical crosstrainer goes through a calibration sequence. Please read through all instructions in this section before using the elliptical crosstrainer. EXERCISING ON THE ELLIPTICAL CROSSTRAINER To mount the elliptical crosstrainer, hold the handlebar and step onto the pedal that is in the lowest position. Next, step onto the other pedal. Push the pedals until they begin to move with a continuous motion. Note: The pedal disks can turn in either direction. It is recommended that you move the pedal disks in the direction shown by the arrow below; however, to give variety to your exercise, you may choose to turn the pedal disks in the opposite direction. The advanced console offers a selection of features designed to make your workouts more enjoyable and effective. When the console is in the manual mode, the incline and resistance of the elliptical crosstrainer can be adjusted with a touch of a button. As you exercise, the LED matrix and displays will provide continuous exercise feedback. You can even measure your heart rate using the built-in pulse sensor. The console also offers ten preset workout programs: four incline programs automatically control the incline of the elliptical crosstrainer as they guide you through effective workouts, four resistance programs automatically control the resistance of the elliptical crosstrainer, and two combination programs control both the incline and the resistance during your workouts. Note: The console can display distance and speed in either miles or kilometres (see step 4 on page 12). For simplicity, all instructions in this section refer to miles. CAUTION: Before operating the console, read the following precautions. Pedal Disk Pedal • Always hold the handlebar when mounting, dismounting, or using the elliptical crosstrainer. • When you stop exercising, allow the pedals to slowly come to a stop. • Keep your feet and objects from beneath the elliptical crosstrainer. To dismount the elliptical crosstrainer, wait until the pedals come to a complete stop. CAUTION: The elliptical crosstrainer does not have a freewheel; the pedals will continue to move until the flywheel stops. When the pedals are stationary, step off the highest pedal first. Then, step off the lowest pedal. • To reduce the risk of electric shock, keep the console dry. Avoid spilling liquid on the console and use only a sealable water bottle. • The pulse sensor is not a medical device. Various factors may affect the accuracy of heart rate readings. The pulse sensor is intended only as an exercise aid in determining heart rate trends in general. 10 CONSOLE DIAGRAM E A L C D B F G B H I J K Note: If there is a thin sheet of clear plastic on the face of the console, remove it. A. INCLINE Display-This display shows the incline level of the elliptical crosstrainer. B. INCLINE PROGRAM Profiles-These profiles show how the incline or resistance of the elliptical crosstrainer will change during workout programs. During the first incline program, for example, the incline will gradually increase during the first half of the program, and then gradually decrease during the last half. C. MANUAL CONTROL Indicator-This indicator will light to show when the manual mode is selected. D. Program Indicators-These indicators light to show when a workout program is selected. and the total number of quarter-mile laps completed. The display will change modes every five seconds. Note: The letter "L" will appear in the display when the number of laps is shown. G. SPEED/CALS/PULSE/RESIST Display- This display shows your current speed, approximate calories burned, and the resistance level. The display will change modes every five seconds. When the pulse sensor is used, the display will also show your heart rate. H. PROGRAM SELECT Button-This button is used to select the manual mode and the workout programs. I. INCLINE Buttons-These buttons control the incline of the elliptical crosstrainer. Each time one of the buttons is pressed, the incline level will change by 3%. The incline range is 3% to 30%. E. LED Matrix-When the manual mode is selected, the LED matrix will show your progress on an LED track. When a preset program is selected, the matrix will show your progress and upcoming incline or resistance settings. F. TIME/DISTANCE/INCLINE Display-This display shows the elapsed time (or the remaining time in a workout program), total distance, the incline level, J. START/PAUSE Button-This button is used to start and pause the console. K. RESISTANCE Buttons-These buttons control the resistance of the elliptical crosstrainer. There are ten resistance levels. L. RESISTANCE Display-This display shows the resistance level of the elliptical crosstrainer. 11
-
 1
1 -
2
-
3
-
4
-
 5
5 -
 6
6 -
 7
7 -
 8
8 -
 9
9 -
 10
10
 |
 |
