HealthRider E660 Instruction Manual - Page 9
How To Use The Manual Mode
 |
View all HealthRider E660 manuals
Add to My Manuals
Save this manual to your list of manuals |
Page 9 highlights
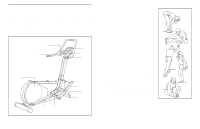
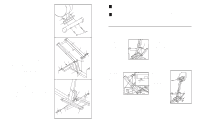
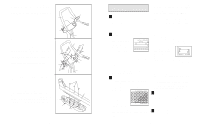
HOW TO USE THE MANUAL MODE 1 Turn on the power Make sure that the power cord is properly plugged in (see page 10). To turn on the power, press the START/PAUSE button or simply begin exercising. The console will sound a tone and various displays and indicators will light. Note: If you have moved the pedals, the power will already be on. 2 Select the manual mode Each time the power is turned on, the manual mode will be selected, as shown by the MANUAL CONTROL indicator. If a workout program has been selected, press the PROGRAM SELECT button repeatedly to scroll through the programs and select the manual mode. Note: When you press the PROGRAM SELECT button, the incline will automatically change to its lowest position. 3 Begin exercising and adjust the incline and resistance As you exercise in manual mode, adjust the incline and resistance as desired by pressing the INCLINE and RESISTANCE buttons. Note: After the buttons are pressed, it may take a few seconds for the selected setting to be reached. 4 Follow your progress with the console displays As you exercise, the LED matrix will display the distance you have travelled on a quarter-mile track. The indicators around the track will light one at a time until the entire track is lit. A new lap will then begin. In addition, the two displays will show the elapsed time, distance, incline level, laps completed, current speed, calories burned, and resistance level, in five-second intervals. Your heart rate will also be shown when the pulse sensor is used (see step 5). Note: The console can display speed in either miles per hour or kilometres per hour. When the power is first turned on, the letters "M" or "K" will appear in the LED matrix to show which measurement is selected. To change the measurement, simultaneously press the INCLINE v and RESISTANCE v but- tons until the console sounds a tone and the new measurement appears. Note: If you select miles per hour, distance will be displayed in miles. If you select kilometres per hour, distance will be displayed in kilometres. 5 Measure your heart rate if desired To use the pulse sensor, place your hands on the Metal Contacts metal contacts. Your palms must be resting on the upper contacts and your fingers must be touching the lower contacts. Avoid moving your hands. When your pulse is detected, the heart-shaped indicator below the right display will flash each time your heart beats. After a moment, three dashes (- - -) will appear and your heart rate will be shown. For the most accurate heart rate reading, continue to hold the contacts for about 15 seconds. The display will show your heart rate for up to two minutes; the display will then show your current speed, calories burned, your heart rate, and the resistance level, in five-second intervals. Note: Your heart rate will be shown only when the pulse sensor is used. 6 When you are finished exercising, the console will automatically turn off after ten minutes If the pedals are not moved and the console buttons are not pressed for ten minutes, the console will automatically switch into a "sleep" mode. Note: Unplug the power cord following each use. 12 11. Apply a small amount of grease to the axle on the left 11 Crank Arm (8). Side a Nylon Washer (78) and the Left Pedal Leg (5) onto the axle on the left Crank Arm (8). Note: It may be helpful to use a rubber mallet to tap these parts on. Be careful not to confuse the Left Pedal Leg with the Right Pedal Leg (not shown); look at the position of the round tube to correctly identify the Left Pedal Leg. Next, tap a 3/4" Axle Cap (40) onto the axle. Attach the Right Pedal Arm (not shown) in the same way. Grease 5 8 78 40 Round Tube 12. Make sure that all parts of the elliptical crosstrainer are properly tightened. Note: There may be some hardware left over after assembly is completed. To protect the floor or carpet from damage, place a mat under the elliptical crosstrainer. 9
-
 1
1 -
2
-
3
-
 4
4 -
 5
5 -
 6
6 -
 7
7 -
 8
8 -
 9
9 -
 10
10
 |
 |
