HealthRider E660 Instruction Manual - Page 8
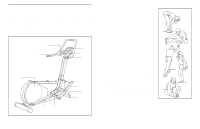
Slide the Right Pedal onto the Right Pedal Leg 6
 |
View all HealthRider E660 manuals
Add to My Manuals
Save this manual to your list of manuals |
Page 8 highlights
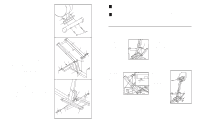
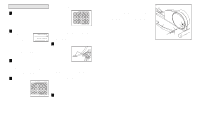
8. While another person holds the Handlebar (13) in the 8 position shown, connect the two Console Plate Wires (106) to the two Pulse Wires (96). Push the wires and connectors into the Handlebar (13). 96 13 106 96 9. With the help of another person, loosely attach the right side of the Handlebar (13) to the Console Upright (3) with two Handlebar Bolts (92), two Curved Washers (74), two Spacers (93), two M10 Flat Washers (94), and two M10 Nylon Locknuts (55). Make sure that the Spacers are positioned between the Handlebar and the Console Plate (101). Be careful to avoid pinching the wires. Attach the left side of the Handlebar (13) in the same way. Firmly tighten all four Handlebar Bolts (92). 10. Identify the Right Pedal Leg (6), which has an "R" sticker attached to it. Next, identify the Right Pedal (23), which has the letter "R" molded onto the bottom. Slide the Right Pedal onto the Right Pedal Leg (6) as shown. Make sure that the plastic posts are completely inserted into the holes in the Right Pedal Leg. Insert the three M4 x 16mm Flange Screws (88) about halfway into the Right Pedal Leg (6) and thread the Screws into the plastic posts on the Right Pedal (23). Using a phillips screwdriver, tighten the three Flange Screws into the plastic posts. Do not overtighten the Flange Screws or the plastic posts may break. Attach the Left Pedal (not shown) in the same way. 106 9 3 13 92 92 74 93 94 55 10 94 93 74 55 93 94 93 101 94 3 88 6 23 Opening Plastic Posts 8 HOW TO USE THE INCLINE PROGRAMS AND THE RESISTANCE PROGRAMS 1 Turn on the power Make sure that the power cord is properly plugged in (see page 10). To turn on the power, press the START/PAUSE button. The console will sound a tone and various displays and indicators will light. Note: If you have moved the pedals, the power will already be on. 2 Select one of the eight incline or resistance programs Each time the power is turned on, the manual mode will be selected, as shown by the MANUAL CONTROL indicator. To select one of the incline or resistance programs, press the PROGRAM SELECT button repeatedly until one of the four incline program indicators or one of the four resistance program indicators lights. Note: When you press the PROGRAM SELECT button, the incline will automatically change to its lowest position. As you select each program, the LED matrix will show the first eight settings of the program you have selected (see step 3). 3 Start the program To start the program, press the START/PAUSE button or simply begin exercising. Each program is divided into twenty, one-minute segments. If an incline program is selected, one incline setting is programmed for each segment; if a resistance program is selected, one resistance setting is programmed for each segment. The setting of the first segment is shown in the flashing CURRENT SEGMENT column of the LED matrix. The settings of the next seven segments are shown in the columns to the right. When only three seconds remain in the first segment, three tones will sound. All settings will then move one column to the left. The setting of the second segment will then be shown in the CURRENT SEGMENT column and the elliptical crosstrainer will adjust to the second setting. If an incline program is selected, the resistance can be changed during the program with the RESISTANCE buttons. If a resistance program is selected, the incline can be changed with the INCLINE buttons. The program will continue until the setting of the twentieth segment is shown in the CURRENT SEGMENT column and the TIME display counts down to zero. The console will then sound a tone and the two displays will pause. The console will remain in this state until the START/PAUSE button or the PROGRAM SELECT button is pressed. If the program is too easy or too difficult, the difficulty level of the program can be adjusted. There are five "fitness levels" (fitness level 5 is the most difficult). If an incline program is selected, press the INCLINE buttons repeatedly to change the fitness level. An "F 1," "F 2," "F 3," "F 4," or "F 5" will appear in the left display to show which fitness level is selected. If a resistance program is selected, press the RESISTANCE buttons to change the fitness level. To pause the program before it is completed, press the START/PAUSE button or allow the pedals to come to a stop and step off the pedals. A tone will sound and the two displays will pause and flash. To restart the program, simply begin exercising again. Note: The console will automatically switch into the sleep mode if the pedals are not moved for ten minutes or longer. 4 Follow your progress with the console displays As you exercise, the two displays will show the time remaining in the program, distance, incline level, laps completed, current speed, calories burned, and resistance level, in five second intervals. Your heart rate will also be shown when the pulse sensor is used (see step 5 on page 12). 5 Measure your heart rate if desired See step 5 on page 12. 13
-
 1
1 -
2
-
 3
3 -
 4
4 -
 5
5 -
 6
6 -
 7
7 -
 8
8 -
 9
9 -
 10
10
 |
 |
