HealthRider E660 Instruction Manual - Page 6
Maintenance And Trouble-shooting
 |
View all HealthRider E660 manuals
Add to My Manuals
Save this manual to your list of manuals |
Page 6 highlights
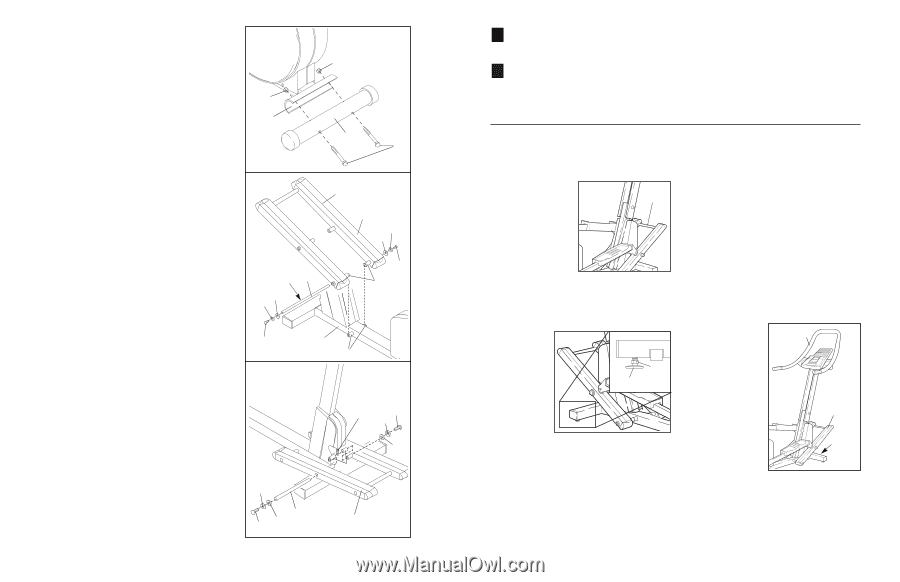
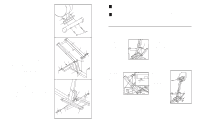
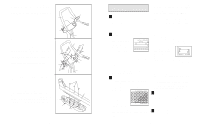
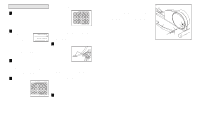
1. Hold the Rear Stabiliser (4) against the saddle on the rear of the Base Frame (1). Make sure that the Rear Stabiliser is turned so the square holes are facing away from the Frame. Attach the Rear Stabiliser with two Carriage Bolts (2) and two M10 Nylon Locknuts (55). 1 55 1 55 4 2 2. Slide an M8 Split Washer (85) and an M8 Washer (89) onto an M8 x 19mm Button Screw (76). Thread the Button Screw into one end of an Incline Axle (15). Next, apply a small amount of the included grease to the Incline Axle. Align the indicated tubes on the Incline Frame (7) with the tubes on the Base Frame (1). Make sure that the Incline Frame is turned so the V-shaped grooves are on top. Insert the Incline Axle (15) through the Incline Frame and the Base Frame. Note: It may be helpful to tap the Incline Axle with a rubber mallet to insert it. Slide an M8 Split Washer (85) and an M8 Washer (89) onto another M8 x 19mm Button Screw (76). Thread the Button Screw into the open end of the Incline Axle (15). Do not tighten the Button Screws yet. 3. Slide an M8 Split Washer (85) and an M8 Washer (89) onto an M8 x 19mm Button Screw (76). Next, thread the Button Screw into one end of the Incline Motor Axle (14). With the help of a second person, raise the Incline Frame (7). Insert the Incline Motor Axle through one side of the Incline Frame, through a Long Plastic Spacer (91), through the end of the motor screw, through another Long Plastic Spacer (91), and through the other side of the Incline Frame. Slide an M8 Split Washer (85) and an M8 Washer (89) onto an M8 x 19mm Button Screw (76). Thread the Button Screw into the open end of the Incline Motor Axle (14). Tighten the four M8 x 19mm Button Screws (76) used in this step and step 2. 2 Grease 15 89 85 V-shaped Groove 7 85 89 76 Tubes 76 3 1 Tubes 85 14 89 76 Motor Screw 85 76 89 91 7 6 5 Measure your heart rate if desired See step 5 on page 12. 6 When you are finished exercising, the console will automatically turn off after ten minutes If the pedals are not moved and the console but- tons are not pressed for ten minutes, the console will automatically switch into a "sleep" mode. Make sure to unplug the power cord after each use. MAINTENANCE AND TROUBLE-SHOOTING Inspect and tighten all parts of the elliptical crosstrainer regularly. Replace any worn parts immediately. For smooth operation of the elliptical crosstrainer, the Incline Frame incline frame should be kept clean. Using a soft cloth and mild detergent, clean dust and other residue from the incline frame where the wheels make contact with it. Other parts of the elliptical crosstrainer can also be cleaned in this man- ner. Never use abrasives or solvents. HOW TO LEVEL THE ELLIPTICAL CROSSTRAINER If the elliptical crosstrainer does not sit flat on the floor, one or both of the levelling pads Jam Pad Nut should be adjusted. First, loosen the jam nut on each levelling pad. Next, turn the levelling pads as needed until the elliptical crosstrainer is level. When the levelling pads are properly adjust- ed, firmly retighten the jam nuts. PULSE SENSOR TROUBLE-SHOOTING • Avoid moving your hands while using the pulse sensor. Excessive movement may interfere with heart rate readings. • Do not hold the metal contacts too tightly; doing so may interfere with heart rate readings. • For the most accurate heart rate reading, hold the metal contacts for about 15 seconds. • For optimal performance of the pulse sensor, keep the metal contacts clean. The contacts can be cleaned with a soft cloth-never use alcohol, abrasives, or chemicals. MOVING THE ELLIPTICAL CROSSTRAINER Before moving the elliptical crosstrainer, adjust the incline to the highest setting by pressing the INCLINE v button. Wait until the incline frame has stopped moving and then unplug the power cord. Handlebar Incline Frame Stand in front of the elliptical crosstrainer, hold the handlebar firmly, and tip the Rollers elliptical crosstrainer forward until it can be moved on the two front rollers. Carefully move the elliptical crosstrainer to the desired location. 15
-
 1
1 -
 2
2 -
 3
3 -
 4
4 -
 5
5 -
 6
6 -
 7
7 -
 8
8 -
 9
9 -
 10
10
 |
 |