HP 1018 Service Manual - Page 101
Print-quality troubleshooting, Print-cartridge problems, Checking the print cartridge
 |
UPC - 882780435094
View all HP 1018 manuals
Add to My Manuals
Save this manual to your list of manuals |
Page 101 highlights
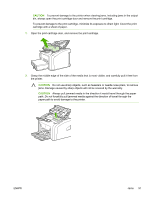
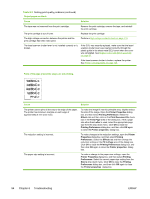
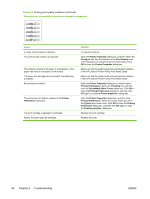
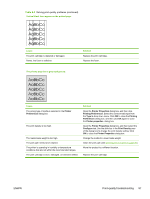
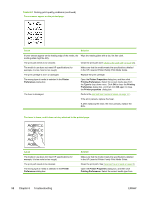
Print-quality troubleshooting Print-cartridge problems Checking the print cartridge Image-formation defects are frequently the result of problems in the print cartridge. If there is any doubt, always replace the print cartridge before troubleshooting image defects. Hint If the transfer roller was recently replaced, print-quality problems might be the result of skin oils on the black-sponge portion of the transfer roller. Do not touch the black-sponge portion of the transfer roller when replacing it. Use the following checklist to make sure that the print cartridge is still operable. ● Make sure that the print cartridge is installed properly and the shipping tape is removed. ● Check the print cartridge to see if it has been disassembled or refilled. ● Inspect the print cartridge to see if toner is leaking through worn seals. ● Check the surface of the photosensitive drum in the cartridge to see if it has been damaged or scratched. Touching the drum contaminates the photosensitive surface and can cause spotting and image defects. ● Blurred areas on printed pages indicate that the photosensitive drum in the cartridge has been overexposed to light. Because overexposure to light causes permanent damage to the photosensitive drum, the cartridge should be replaced. To redistribute toner in the print cartridge Before installing a new print cartridge or when toner begins to run low, redistribute the toner by rocking the cartridge back and forth five or six times. Solving print-quality problems Use the following tables to help solve problems with printed pages. If the problem occurs when printing, see Solving paper-feed problems on page 105. Table 6-3 Solving print-quality problems No page is produced. Cause The product is not plugged in or power switch is off. The printer is registering a jam. The computer cable is loose. Solution Make sure that the product is plugged into a live wall outlet or power strip and that the on/off switch is in the on position. Check the lights. If the Attention light is flashing, the printer might be jammed. Clear the jam. Make sure that the cable between the product and the computer is securely connected. ENWW Print-quality troubleshooting 93
-
 1
1 -
2
-
3
-
4
-
5
-
6
-
7
-
8
-
9
-
10
-
11
-
12
-
13
-
14
-
15
-
16
-
17
-
18
-
19
-
20
-
21
-
22
-
23
-
24
-
25
-
26
-
27
-
28
-
29
-
30
-
31
-
32
-
33
-
34
-
35
-
36
-
37
-
38
-
39
-
40
-
41
-
42
-
43
-
44
-
45
-
46
-
47
-
48
-
49
-
50
-
51
-
52
-
53
-
54
-
55
-
56
-
57
-
58
-
59
-
60
-
61
-
62
-
63
-
64
-
65
-
66
-
67
-
68
-
69
-
70
-
71
-
72
-
73
-
74
-
75
-
76
-
77
-
78
-
79
-
80
-
81
-
82
-
83
-
84
-
85
-
86
-
87
-
88
-
89
-
90
-
91
-
92
-
93
-
94
-
95
-
 96
96 -
 97
97 -
 98
98 -
 99
99 -
 100
100 -
 101
101 -
 102
102 -
 103
103 -
 104
104 -
 105
105 -
 106
106 -
107
-
108
-
109
-
110
-
111
-
112
-
113
-
114
-
115
-
116
-
117
-
118
-
119
-
120
-
121
-
122
-
123
-
124
-
125
-
126
-
127
-
128
-
129
-
130
-
131
-
132
-
133
-
134
-
135
-
136
-
137
-
138
-
139
-
140
-
141
-
142
-
143
-
144
 |
 |
