HP 2430tn HP LaserJet 2400 Series - User Guide - Page 135
Size In Tray X
 |
UPC - 829160290515
View all HP 2430tn manuals
Add to My Manuals
Save this manual to your list of manuals |
Page 135 highlights
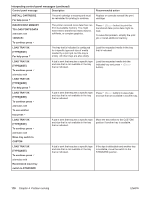
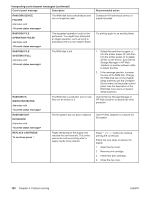
Interpreting control-panel messages (continued) Control panel message Description Recommended action 22 PARALLEL I/O BUFFER OVERFLOW alternates with To continue press Too much data was sent to the parallel port. 1. Check for a loose cable connection and be sure to use a high-quality cable. Some non-HP parallel cables might be missing pin connections or might otherwise not conform to the IEEE-1284 specification. (See Ordering parts, accessories, and supplies.) 2. This error can occur if the driver you are using is not IEEE-1284 compliant. For best results, use an HP driver that came with the printer. (See Software.) 3. Press (SELECT button) to clear the error message. (The job will not be printed.) 4. If the message persists, contact an HP-authorized service or support provider (see HP customer care). 22 USB I/O BUFFER OVERFLOW alternates with To continue press Too much data was sent to the USB port. Press (SELECT button) to clear the error message. (The job will not be printed.) 40 EIO X BAD TRANSMISSION alternates with To continue press The connection has been broken between the printer and the EIO card in the specified slot [X]. Note: EIO 0 is reserved for the HP Jetdirect embedded print server. Press (SELECT button) to clear the error message and continue printing. 41.X ERROR For help press alternates with 41.X ERROR To continue press A temporary printing error occurred. 1. Press (SELECT button). The page containing the error automatically reprints if jam recovery is enabled. 2. Turn the printer power off, and then turn the printer power on. 3. If the message persists, contact an HP-authorized service or support provider (see HP customer care). 41.3 UNEXPECTED SIZE IN TRAY X alternates with LOAD TRAY XX [TYPE][SIZE] This is typically caused if two or more sheets stick together in the printer or if the tray is not properly adjusted. 1. Reload the tray with the correct paper size. 2. Press (SELECT button) to scroll to TRAY XX SIZE=. Reconfigure the size in a tray so that the printer will use a tray that contains the size required for the print job. 3. If the error does not clear, turn the printer power off, then turn the printer power on. 4. If the message persists, contact an HP-authorized service or support provider (see HP customer care). ENWW Understanding printer messages 123
-
 1
1 -
2
-
3
-
4
-
5
-
6
-
7
-
8
-
9
-
10
-
11
-
12
-
13
-
14
-
15
-
16
-
17
-
18
-
19
-
20
-
21
-
22
-
23
-
24
-
25
-
26
-
27
-
28
-
29
-
30
-
31
-
32
-
33
-
34
-
35
-
36
-
37
-
38
-
39
-
40
-
41
-
42
-
43
-
44
-
45
-
46
-
47
-
48
-
49
-
50
-
51
-
52
-
53
-
54
-
55
-
56
-
57
-
58
-
59
-
60
-
61
-
62
-
63
-
64
-
65
-
66
-
67
-
68
-
69
-
70
-
71
-
72
-
73
-
74
-
75
-
76
-
77
-
78
-
79
-
80
-
81
-
82
-
83
-
84
-
85
-
86
-
87
-
88
-
89
-
90
-
91
-
92
-
93
-
94
-
95
-
96
-
97
-
98
-
99
-
100
-
101
-
102
-
103
-
104
-
105
-
106
-
107
-
108
-
109
-
110
-
111
-
112
-
113
-
114
-
115
-
116
-
117
-
118
-
119
-
120
-
121
-
122
-
123
-
124
-
125
-
126
-
127
-
128
-
129
-
 130
130 -
 131
131 -
 132
132 -
 133
133 -
 134
134 -
 135
135 -
 136
136 -
 137
137 -
 138
138 -
 139
139 -
 140
140 -
141
-
142
-
143
-
144
-
145
-
146
-
147
-
148
-
149
-
150
-
151
-
152
-
153
-
154
-
155
-
156
-
157
-
158
-
159
-
160
-
161
-
162
-
163
-
164
-
165
-
166
-
167
-
168
-
169
-
170
-
171
-
172
-
173
-
174
-
175
-
176
-
177
-
178
-
179
-
180
-
181
-
182
-
183
-
184
-
185
-
186
-
187
-
188
-
189
-
190
-
191
-
192
-
193
-
194
-
195
-
196
-
197
-
198
-
199
-
200
-
201
-
202
-
203
-
204
-
205
-
206
-
207
-
208
-
209
-
210
-
211
-
212
-
213
-
214
-
215
-
216
-
217
-
218
-
219
-
220
-
221
-
222
-
223
-
224
-
225
-
226
-
227
-
228
-
229
-
230
-
231
-
232
-
233
-
234
-
235
-
236
-
237
-
238
-
239
-
240
-
241
-
242
-
243
-
244
-
245
-
246
-
247
-
248
-
249
-
250
-
251
-
252
 |
 |
