HP 2600 HP Business Inkjet 2600/2600dn - (English) User's Guide - Page 67
Configuring paper trays, Using the paper trays to meet your printing needs
 |
View all HP 2600 manuals
Add to My Manuals
Save this manual to your list of manuals |
Page 67 highlights
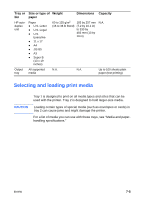
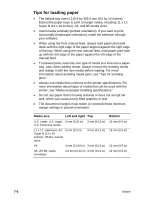
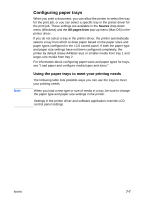
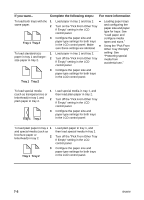
Note Configuring paper trays When you print a document, you can allow the printer to select the tray for the print job, or you can select a specific tray in the printer driver for the print job. These settings are available in the Source drop-down menu (Windows) and the All pages from pop-up menu (Mac OS) in the printer driver. If you do not select a tray in the printer driver, the printer automatically selects a tray from which to draw paper based on the paper sizes and paper types configured in the LCD control panel. If both the paper type and paper size settings have not been configured completely, the printer by default draws A4/letter-size or smaller media from tray 1 and larger-size media from tray 2. For information about configuring paper sizes and paper types for trays, see "Load paper and configure media types and sizes." Using the paper trays to meet your printing needs The following table lists possible ways you can use the trays to meet your printing needs. When you load a new type or size of media in a tray, be sure to change the paper type and paper size settings in the printer. Settings in the printer driver and software application override LCD control panel settings. ENWW 7-7
-
 1
1 -
2
-
3
-
4
-
5
-
6
-
7
-
8
-
9
-
10
-
11
-
12
-
13
-
14
-
15
-
16
-
17
-
18
-
19
-
20
-
21
-
22
-
23
-
24
-
25
-
26
-
27
-
28
-
29
-
30
-
31
-
32
-
33
-
34
-
35
-
36
-
37
-
38
-
39
-
40
-
41
-
42
-
43
-
44
-
45
-
46
-
47
-
48
-
49
-
50
-
51
-
52
-
53
-
54
-
55
-
56
-
57
-
58
-
59
-
60
-
61
-
 62
62 -
 63
63 -
 64
64 -
 65
65 -
 66
66 -
 67
67 -
 68
68 -
 69
69 -
 70
70 -
 71
71 -
 72
72 -
73
-
74
-
75
-
76
-
77
-
78
-
79
-
80
-
81
-
82
-
83
-
84
-
85
-
86
-
87
-
88
-
89
-
90
-
91
-
92
-
93
-
94
-
95
-
96
-
97
-
98
-
99
-
100
-
101
-
102
-
103
-
104
-
105
-
106
-
107
-
108
-
109
-
110
-
111
-
112
-
113
-
114
-
115
-
116
-
117
-
118
-
119
-
120
-
121
-
122
-
123
-
124
-
125
-
126
-
127
-
128
-
129
-
130
-
131
-
132
-
133
-
134
-
135
-
136
-
137
-
138
-
139
-
140
-
141
-
142
 |
 |
