HP 2x1Ex16 HP IP Console Viewer User Guide - Page 13
Establishing LAN connections, Windows XP SP1 or newer
 |
View all HP 2x1Ex16 manuals
Add to My Manuals
Save this manual to your list of manuals |
Page 13 highlights
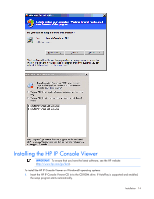
NOTE: The following Linux example uses Red Hat 3.0. For more information, refer to your Linux operating system's HELP or documentation. To synchronize the mouse pointers for Linux operating systems (GNOME): 1. Click the main menu. 2. From the main menu task list, select Programs>Settings>Peripherals. 3. From the Peripherals task list, select Mouse. The Mouse Configuration window appears. In this window, you can set the mouse to be either right-handed or left-handed and adjust the mouse motion by changing the threshold and adjusting the acceleration to the fourth position from the far left. To synchronize the mouse pointers for Linux operating systems (KDE): 1. Go to the main menu, and select K Menu>KDE Control Center>Input Devices>Mouse. 2. Set the acceleration to 1X. 3. Apply the settings, and click OK. Establishing LAN connections To connect an HP IP Console Switch to a network: NOTE: Although 10Base-T Ethernet can be used, HP recommends a dedicated, switched 100Base-T network (or better) for improved performance. HP IP Console Switches with Virtual Media are capable of 1G. Connect the network cable from the LAN port on the rear panel of the HP IP Console Switch to the network, and then power on all attached systems. The following ports must be open on your network, for both UDP and TCP protocols, for the HP IP Console Viewer to work properly: • 2068 • 8192 • 3211 • 161 • 162 • 389 (LDAP) • 636 (secure LDAP) Windows XP SP1 or newer To add a console switch without a preconfigured IP address and when the client software application is not listed in the Windows® XP Firewall Exceptions List, the program must be added to the list of Windows® XP Firewall Exceptions, and its scope must be set to the whole Internet. NOTE: When installing the HP IP Console Viewer on a Windows Server™ 2003 server, if you do not get a security dialog box and the installation program stops, you might need to restart the server to get the security dialog. NOTE: At the program startup, if you select Unblock, unblock is the default setting. Installation 13
-
 1
1 -
2
-
3
-
4
-
5
-
6
-
7
-
 8
8 -
 9
9 -
 10
10 -
 11
11 -
 12
12 -
 13
13 -
 14
14 -
 15
15 -
 16
16 -
 17
17 -
 18
18 -
19
-
20
-
21
-
22
-
23
-
24
-
25
-
26
-
27
-
28
-
29
-
30
-
31
-
32
-
33
-
34
-
35
-
36
-
37
-
38
-
39
-
40
-
41
-
42
-
43
-
44
-
45
-
46
-
47
-
48
-
49
-
50
-
51
-
52
-
53
-
54
-
55
-
56
-
57
-
58
-
59
-
60
-
61
-
62
-
63
-
64
-
65
-
66
-
67
-
68
-
69
-
70
-
71
-
72
-
73
-
74
-
75
-
76
-
77
-
78
-
79
-
80
-
81
-
82
-
83
-
84
-
85
-
86
-
87
-
88
-
89
-
90
-
91
-
92
-
93
-
94
-
95
-
96
-
97
-
98
-
99
-
100
-
101
-
102
-
103
-
104
-
105
-
106
-
107
-
108
-
109
-
110
-
111
-
112
-
113
-
114
-
115
-
116
-
117
-
118
-
119
-
120
-
121
-
122
-
123
-
124
-
125
-
126
-
127
-
128
-
129
-
130
-
131
-
132
-
133
-
134
-
135
-
136
-
137
-
138
-
139
-
140
-
141
-
142
-
143
-
144
-
145
-
146
-
147
-
148
-
149
-
150
-
151
-
152
-
153
-
154
-
155
-
156
-
157
-
158
-
159
-
160
-
161
-
162
-
163
-
164
-
165
-
166
-
167
-
168
-
169
-
170
-
171
-
172
-
173
-
174
-
175
-
176
-
177
-
178
-
179
-
180
-
181
-
182
-
183
-
184
-
185
-
186
-
187
-
188
-
189
-
190
-
191
-
192
-
193
-
194
-
195
-
196
-
197
-
198
-
199
-
200
-
201
-
202
-
203
-
204
-
205
-
206
-
207
-
208
-
209
-
210
-
211
-
212
-
213
-
214
-
215
-
216
-
217
-
218
-
219
-
220
-
221
-
222
-
223
-
224
-
225
-
226
-
227
-
228
-
229
-
230
-
231
-
232
-
233
-
234
-
235
-
236
-
237
-
238
-
239
-
240
-
241
-
242
-
243
-
244
-
245
-
246
-
247
-
248
-
249
-
250
-
251
-
252
-
253
-
254
-
255
-
256
-
257
-
258
-
259
-
260
-
261
-
262
-
263
-
264
-
265
-
266
-
267
-
268
-
269
-
270
-
271
-
272
-
273
-
274
-
275
-
276
-
277
-
278
-
279
-
280
-
281
-
282
-
283
-
284
-
285
-
286
-
287
-
288
-
289
-
290
-
291
-
292
-
293
-
294
-
295
-
296
-
297
-
298
-
299
-
300
-
301
-
302
-
303
-
304
-
305
-
306
-
307
-
308
-
309
-
310
-
311
-
312
-
313
-
314
-
315
-
316
-
317
-
318
-
319
-
320
-
321
-
322
-
323
-
324
-
325
-
326
-
327
-
328
-
329
-
330
-
331
-
332
-
333
-
334
-
335
-
336
-
337
-
338
-
339
 |
 |
