HP 2x1Ex16 HP IP Console Viewer User Guide - Page 77
Using a smart card through Video Session Viewer, Accessing the Video Session Viewer
 |
View all HP 2x1Ex16 manuals
Add to My Manuals
Save this manual to your list of manuals |
Page 77 highlights
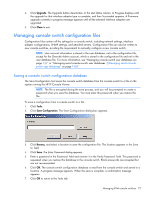
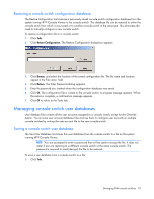
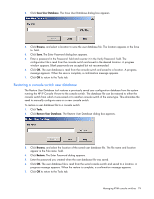
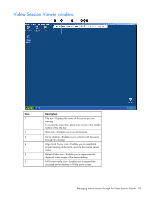
Using a smart card through Video Session Viewer After you connect a smart card reader to an available USB port on the client server and are able to access target devices, you can launch a KVM session to open the Video Session Viewer and map a smart card. The smart card status is indicated by the icon at the far right of the Video Session Viewer toolbar. One of the following status icons appears. Icon Description A smart card is not in the smart card reader, or a smart card reader is not attached. A smart card is in the smart card reader, but it has not been mapped. A smart card is mapped.A smart card is mapped. To map a smart card: 1. Launch a KVM session. The Video Session Viewer window appears. 2. Insert a smart card in to the smart card reader attached to your client server. 3. From the Video Session Viewer, select Tools>Map Smart Card. 4. Select your smart card, listed below the No Card Mapped option, to map the smart card. To unmap a smart card you can: • Close the KVM session by clicking the X in the Video Session Viewer window. • From the Virtual Session Viewer, select Tools>No Card Mapped. • Remove the smart card reader, or disconnect the smart card reader from the client server. Accessing the Video Session Viewer 1. Click Servers. 2. Double-click the server name. -orSelect a server, and click Launch KVM Session. -orRight-click the server name, and select Launch KVM Session. -orSelect a server, and press Enter. The Video Session Viewer launches in a new window. NOTE: If this is the first unit access of the HP IP Console Viewer session, you might be prompted for a user name and password. Requests for login credentials during subsequent access attempts are affected by the credential caching settings. For more information on cached credentials, if you have not previously entered and cached successfully, refer to "Managing cached credentials (on page 34)." Managing remote servers through the Video Session Viewer 77
-
 1
1 -
2
-
3
-
4
-
5
-
6
-
7
-
8
-
9
-
10
-
11
-
12
-
13
-
14
-
15
-
16
-
17
-
18
-
19
-
20
-
21
-
22
-
23
-
24
-
25
-
26
-
27
-
28
-
29
-
30
-
31
-
32
-
33
-
34
-
35
-
36
-
37
-
38
-
39
-
40
-
41
-
42
-
43
-
44
-
45
-
46
-
47
-
48
-
49
-
50
-
51
-
52
-
53
-
54
-
55
-
56
-
57
-
58
-
59
-
60
-
61
-
62
-
63
-
64
-
65
-
66
-
67
-
68
-
69
-
70
-
71
-
 72
72 -
 73
73 -
 74
74 -
 75
75 -
 76
76 -
 77
77 -
 78
78 -
 79
79 -
 80
80 -
 81
81 -
 82
82 -
83
-
84
-
85
-
86
-
87
-
88
-
89
-
90
-
91
-
92
-
93
-
94
-
95
-
96
-
97
-
98
-
99
-
100
-
101
-
102
-
103
-
104
-
105
-
106
-
107
-
108
-
109
-
110
-
111
-
112
-
113
-
114
-
115
-
116
-
117
-
118
-
119
-
120
-
121
-
122
-
123
-
124
-
125
-
126
-
127
-
128
-
129
-
130
-
131
-
132
-
133
-
134
-
135
-
136
-
137
-
138
-
139
-
140
-
141
-
142
-
143
-
144
-
145
-
146
-
147
-
148
-
149
-
150
-
151
-
152
-
153
-
154
-
155
-
156
-
157
-
158
-
159
-
160
-
161
-
162
-
163
-
164
-
165
-
166
-
167
-
168
-
169
-
170
-
171
-
172
-
173
-
174
-
175
-
176
-
177
-
178
-
179
-
180
-
181
-
182
-
183
-
184
-
185
-
186
-
187
-
188
-
189
-
190
-
191
-
192
-
193
-
194
-
195
-
196
-
197
-
198
-
199
-
200
-
201
-
202
-
203
-
204
-
205
-
206
-
207
-
208
-
209
-
210
-
211
-
212
-
213
-
214
-
215
-
216
-
217
-
218
-
219
-
220
-
221
-
222
-
223
-
224
-
225
-
226
-
227
-
228
-
229
-
230
-
231
-
232
-
233
-
234
-
235
-
236
-
237
-
238
-
239
-
240
-
241
-
242
-
243
-
244
-
245
-
246
-
247
-
248
-
249
-
250
-
251
-
252
-
253
-
254
-
255
-
256
-
257
-
258
-
259
-
260
-
261
-
262
-
263
-
264
-
265
-
266
-
267
-
268
-
269
-
270
-
271
-
272
-
273
-
274
-
275
-
276
-
277
-
278
-
279
-
280
-
281
-
282
-
283
-
284
-
285
-
286
-
287
-
288
-
289
-
290
-
291
-
292
-
293
-
294
-
295
-
296
-
297
-
298
-
299
-
300
-
301
-
302
-
303
-
304
-
305
-
306
-
307
-
308
-
309
-
310
-
311
-
312
-
313
-
314
-
315
-
316
-
317
-
318
-
319
-
320
-
321
-
322
-
323
-
324
-
325
-
326
-
327
-
328
-
329
-
330
-
331
-
332
-
333
-
334
-
335
-
336
-
337
-
338
-
339
 |
 |
