HP 4410t Thin Client Printing with the HP Universal Print Driver - White Paper - Page 3
Printing with HP Thin Clients, The HP Universal Print Driver for Thin Clients add-on
 |
UPC - 884962419915
View all HP 4410t manuals
Add to My Manuals
Save this manual to your list of manuals |
Page 3 highlights
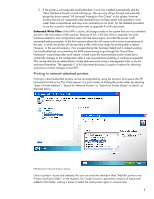
Printing with HP Thin Clients The idea of this new solution is, instead of installing one driver for each printer connected to your thin client, to install the UPD for Thin clients, which supports a wide range of HP printers (please check the appendix A to review the list of supported printers). The HP Universal Print Driver for Thin Clients add-on HP has developed a printing add-on for thin clients; this add-on is a re-packaging of the HP Universal Print Driver with changes to make it more suitable for the thin client software environment. For example, due to disk space limitations, the current version is available only in English and with no help files. Please go to the "Software & driver downloads" section within thin client page for downloading this add-on. For detailed specification, other downloads and documentation about the original UPD visit the website http://www.hp.com/go/upd. Installing the add-on For information regarding the procedure for deploying the add-on to your clients please refer to the documentation of your management suite. This section will cover specifics of the package and recommended configurations. Also, please make sure the image running on the clients meets the prerequisites stated earlier. One important step when performing a scripted install is to ensure there is enough temporary space for the installer's files. The easiest way to ensure this regardless of the current status of the client machine is to temporarily set the user's temp folder to a network share with appropriate access permissions and enough free space to complete the install. To change the user's temp folder location, set the environment variables %TEMP% and %TMP% to the new location (like a network share) at the beginning of the install script, restoring their values at the end of the script. Please refer to the documentation of your management suite for instructions on modifying installation script files. Uninstalling the add-on UPD for Thin Clients provides an uninstaller to remove the add-on from Windows. The uninstaller can be launched from the Add or Remove Programs application located at Windows Control panel by clicking the Remove button. The procedure is the same as uninstalling any other application. Printing to locally-attached printers Locally-attached printers are those directly connected to the thin client by means of a USB or parallel port connection. Within the scope of this document other means of local connection such as a serial or infrared port are neither considered nor supported. Assuming the UPD for Thin Clients is already installed, once the user plugs-in a supported plugand-play printer for the first time, one of two things will happen: 1. If the printer is supported locally-attached (refer to appendix A for the list of supported printers), all the configuration will be handled automatically and after a short while (up to one minute) a new print queue will show-up under "Printers and Faxes" named after the printer's model name. The user can now print normally to this printer from any local application. 3
-
 1
1 -
 2
2 -
 3
3 -
 4
4 -
 5
5 -
 6
6 -
 7
7 -
 8
8 -
 9
9 -
10
-
11
-
12
-
13
-
14
-
15
-
16
-
17
-
18
 |
 |