HP 4650dn HP Color LaserJet 4650 series printer - User Guide - Page 69
Clearable warnings, Auto continue, To set the personality, To set the clearable warnings
 |
UPC - 829160106267
View all HP 4650dn manuals
Add to My Manuals
Save this manual to your list of manuals |
Page 69 highlights
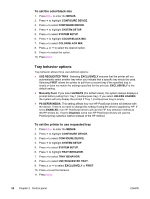
To set the personality 1. Press MENU to enter the MENUS. 2. Press to highlight CONFIGURE DEVICE. 3. Press to select CONFIGURE DEVICE. 4. Press to highlight SYSTEM SETUP. 5. Press to select SYSTEM SETUP. 6. Press to highlight PERSONALITY. 7. Press to select PERSONALITY. 8. Press or to select the appropriate personality (AUTO, PCL, PDF, PS, MIME). 9. Press to set the personality. 10. Press MENU. Clearable warnings You can determine the display time of control panel clearable warnings with this option by selecting ON or JOB. The default value is JOB. ● ON displays clearable warnings until you press . ● JOB displays clearable warnings until the end of the job in which it was generated. To set the clearable warnings 1. Press MENU to enter the MENUS. 2. Press to highlight CONFIGURE DEVICE. 3. Press to select CONFIGURE DEVICE. 4. Press to highlight SYSTEM SETUP. 5. Press to select SYSTEM SETUP. 6. Press to highlight CLEARABLE WARNINGS. 7. Press to select CLEARABLE WARNINGS. 8. Press or to select the appropriate setting. 9. Press to set the selection. 10. Press MENU. Auto continue You can determine printer behavior when the system generates an Auto Continuable error. ON is the default setting. ● ON displays an error message for ten seconds before automatically continuing to print. ● OFF pauses printing any time the printer displays an error message and until you press . ENWW Changing printer control panel configuration settings 55
-
 1
1 -
2
-
3
-
4
-
5
-
6
-
7
-
8
-
9
-
10
-
11
-
12
-
13
-
14
-
15
-
16
-
17
-
18
-
19
-
20
-
21
-
22
-
23
-
24
-
25
-
26
-
27
-
28
-
29
-
30
-
31
-
32
-
33
-
34
-
35
-
36
-
37
-
38
-
39
-
40
-
41
-
42
-
43
-
44
-
45
-
46
-
47
-
48
-
49
-
50
-
51
-
52
-
53
-
54
-
55
-
56
-
57
-
58
-
59
-
60
-
61
-
62
-
63
-
 64
64 -
 65
65 -
 66
66 -
 67
67 -
 68
68 -
 69
69 -
 70
70 -
 71
71 -
 72
72 -
 73
73 -
 74
74 -
75
-
76
-
77
-
78
-
79
-
80
-
81
-
82
-
83
-
84
-
85
-
86
-
87
-
88
-
89
-
90
-
91
-
92
-
93
-
94
-
95
-
96
-
97
-
98
-
99
-
100
-
101
-
102
-
103
-
104
-
105
-
106
-
107
-
108
-
109
-
110
-
111
-
112
-
113
-
114
-
115
-
116
-
117
-
118
-
119
-
120
-
121
-
122
-
123
-
124
-
125
-
126
-
127
-
128
-
129
-
130
-
131
-
132
-
133
-
134
-
135
-
136
-
137
-
138
-
139
-
140
-
141
-
142
-
143
-
144
-
145
-
146
-
147
-
148
-
149
-
150
-
151
-
152
-
153
-
154
-
155
-
156
-
157
-
158
-
159
-
160
-
161
-
162
-
163
-
164
-
165
-
166
-
167
-
168
-
169
-
170
-
171
-
172
-
173
-
174
-
175
-
176
-
177
-
178
-
179
-
180
-
181
-
182
-
183
-
184
-
185
-
186
-
187
-
188
-
189
-
190
-
191
-
192
-
193
-
194
-
195
-
196
-
197
-
198
-
199
-
200
-
201
-
202
-
203
-
204
-
205
-
206
-
207
-
208
-
209
-
210
-
211
-
212
-
213
-
214
-
215
-
216
-
217
-
218
-
219
-
220
-
221
-
222
-
223
-
224
-
225
-
226
-
227
-
228
-
229
-
230
-
231
-
232
-
233
-
234
-
235
-
236
-
237
-
238
-
239
-
240
-
241
-
242
-
243
-
244
-
245
-
246
-
247
-
248
-
249
-
250
-
251
-
252
-
253
-
254
-
255
-
256
-
257
-
258
-
259
-
260
-
261
-
262
-
263
-
264
-
265
-
266
-
267
-
268
-
269
-
270
-
271
-
272
-
273
-
274
-
275
-
276
 |
 |
