HP 6120G/XG HP ProCurve Series 6120 Blade Switches Installation and Getting St - Page 20
ProCurve Switch 6120G/XG, Connecting the console cable., Direct Console Access
 |
View all HP 6120G/XG manuals
Add to My Manuals
Save this manual to your list of manuals |
Page 20 highlights
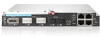
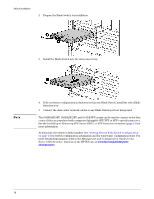
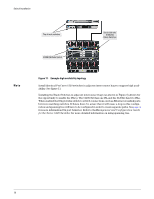
Switch Installation 12 ■ OnBoard Administrator: • (preferred) Through the enclosure manager as described on page 11, "Accessing the Blade Switch from the HP BladeSystem Onboard Administrator" • Telnet to the out-of-band management port IP address. This is the IP address described on page 8. ■ In-Band: Access the console using Telnet from a PC or UNIX station on the network, and a VT-100 terminal emulator. This method requires that you first configure the switch with an IP address and subnet mask by using either out-of-band console access or through DHCP/Bootp. For more information on IP addressing and on starting a Telnet session, see the "Getting Started With Switch Configuration" section, and the Management and Configuration Guide for the Series 6120 Switches, which is on the HP Web site www.hp.com/go/bladesystem/documentation. The Switch can simultaneously support six console sessions. One through the USB Console Port, four through in-band Telnet console sessions, and one through the enclosure manager. Direct Console Access To connect a console to the switch, follow these steps: 1. Connect the laptop or terminal to the switch's Console Port using the console cable included with the Switch. Console port 2. Turn on the laptop or terminal's power and, if using a laptop, start the laptop terminal program. 3. Press [Enter] two or three times and you will see the copyright page and the message "Press any key to continue". Press a key, and you will then see the switch console command (CLI) prompt, for example: Console cable supplied with the switch ProCurve Switch 6120G/XG# If you want to continue with console management of the switch at this time, see the, PC running a terminal emulator program, or a VT-100 terminal "Getting Started With Switch Configuration" section for some basic configuration steps. For more detailed information, refer to the Figure 7. Connecting the console cable. Management and Configuration Guide for the Series 6120 Switches, which is on the HP Web site at www.hp.com/go/bladesystem/documentation. The blade switch console supports out-of-band access through a direct connection to the mini USB console port from a Windows computer. To communicate with the blade switch: 1. Download the USB driver onto the PC. To find the driver: a. Go to www.hp.com/#Support. b. Click the "Download drivers and software" radio button. c. Enter "6120XG" or "6120G/XG" in the text box and click "Go". d. Click the link for your operating system. e. Download the Utilities package. 2. Install the driver by double-clicking the HPProCurve_USBConsole.msi file. 3. Connect the small end of the supplied USB console cable to the mini USB port.
-
 1
1 -
2
-
3
-
4
-
5
-
6
-
7
-
8
-
9
-
10
-
11
-
12
-
13
-
14
-
 15
15 -
 16
16 -
 17
17 -
 18
18 -
 19
19 -
 20
20 -
 21
21 -
 22
22 -
 23
23 -
 24
24 -
 25
25 -
26
-
27
-
28
-
29
-
30
-
31
-
32
-
33
-
34
-
35
-
36
-
37
-
38
-
39
-
40
-
41
-
42
-
43
-
44
-
45
-
46
-
47
-
48
-
49
-
50
-
51
-
52
-
53
-
54
-
55
-
56
-
57
-
58
-
59
-
60
-
61
-
62
 |
 |
