HP 6120G/XG HP ProCurve Series 6120 Blade Switches Installation and Getting St - Page 33
Diagnosing the 6120G/XG with the LEDs, Diagnostic Tips:
 |
View all HP 6120G/XG manuals
Add to My Manuals
Save this manual to your list of manuals |
Page 33 highlights
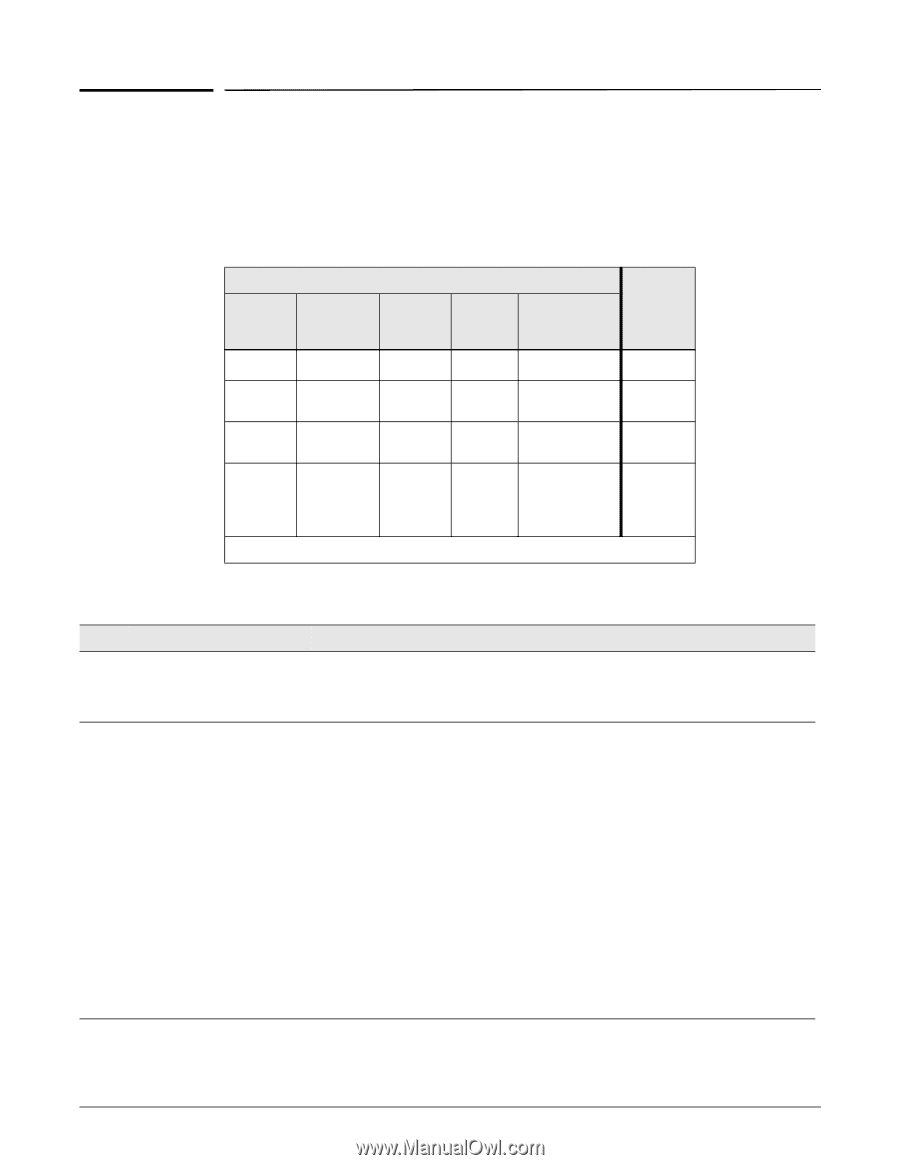
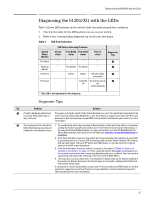
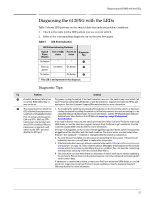
Diagnosing the 6120G/XG with the LEDs Diagnosing the 6120G/XG with the LEDs Table 3 shows LED patterns on the switch blade that indicate problem conditions. 1. Check in the table for the LED pattern you see on your switch. 2. Refer to the corresponding diagnostic tip on the next few pages. Table 4 LED Error Indicators Switch Status (Health) On Amber Flashing Amber On Green On Green LED Pattern Indicating Problems C1 port status Port X1/X2 Port S1/S2 status status Port 1-4 status Diagnostic Tips 1 1 1 1 ➊ 1 On Amber On Amber 1 ➋ Amber Amber Off with cable ➌ connected Link LED On, but the port is ➍ off not communicating 1 This LED is not important for this diagnosis. Diagnostic Tips: Tip Problem Solution ➊ A switch hardware failure has Try power cycling the switch. If the fault indication reoccurs, the switch may have failed. Call occurred. Other LEDs may or your ProCurve authorized LAN dealer, or use the electronic support services from HP to get may not be on. assistance. See the Customer Support/Warranty booklet included with your switch, for more information. ➋ The network port for which the 1. Try resetting the switch by pressing the Reset button on the front of the switch, or by power LED is flashing has experienced cycling the switch by pulling the switch out of the Interconnect slot and reinserting it, or a self test or initialization failure. by using the Onboard Administrator, for more information, see the HP BladeSystem On- board Administrator User Guide on the HP Web site www.hp.com/go/bladesystem/docu- mentation. 2. If the fault indication reoccurs, the switch port may have failed.For example, if a port LED is green that port is ok, if a port LED is blinking amber and the Switch Status LED is Amber, that port has failed. Call your HP authorized LAN dealer, or use the electronic support services from HP to get assistance. 3. If the fault indication reoccurs, attach a console to the switch ("(Optional) Connect a Console to the Switch" on page 11). Then, reset the switch. Messages should appear on the console screen and in the console log identifying the error condition. You can view the console log at that point by selecting it from the console Main Menu. 4. This indication can also mean there is a mismatch of switch with server blades installed in the enclosure. Ensure devices in the device bays are correctly configured and matched with switch switch bays. If necessary to resolve the problem, contact your ProCurve authorized LAN dealer, or use the electronic support services from ProCurve to get assistance. See the Customer Support/ Warranty booklet for more information. 25
-
 1
1 -
2
-
3
-
4
-
5
-
6
-
7
-
8
-
9
-
10
-
11
-
12
-
13
-
14
-
15
-
16
-
17
-
18
-
19
-
20
-
21
-
22
-
23
-
24
-
25
-
26
-
27
-
 28
28 -
 29
29 -
 30
30 -
 31
31 -
 32
32 -
 33
33 -
 34
34 -
 35
35 -
 36
36 -
 37
37 -
 38
38 -
39
-
40
-
41
-
42
-
43
-
44
-
45
-
46
-
47
-
48
-
49
-
50
-
51
-
52
-
53
-
54
-
55
-
56
-
57
-
58
-
59
-
60
-
61
-
62
 |
 |