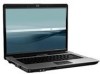
HP 6720s HP Business Notebook PC - Getting Started Guide - Enhanced for Access - Page 14
Backing up specific files or folders, Backing up the entire hard drive
 |
UPC - 883585979370
View all HP 6720s manuals
Add to My Manuals
Save this manual to your list of manuals |
Page 14 highlights
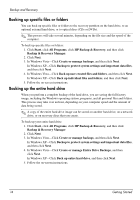
Backup and Recovery Backing up specific files or folders You can back up specific files or folders to the recovery partition on the hard drive, to an optional external hard drive, or to optical discs (CDs or DVDs). ✎ This process will take several minutes, depending on the file size and the speed of the computer. To back up specific files or folders: 1. Click Start, click All Programs, click HP Backup & Recovery, and then click Backup & Recovery Manager. 2. Click Next. 3. In Windows Vista-Click Create or manage backups, and then click Next. In Windows XP-Click Backup to protect system settings and important data files, and then click Next. 4. In Windows Vista-Click Back up user created files and folders, and then click Next. In Windows XP-Click Back up individual files and folders, and then click Next. 5. Follow the on-screen instructions. Backing up the entire hard drive When you perform a complete backup of the hard drive, you are saving the full factory image, including the Windows operating system, programs, and all personal files and folders. This process may take over an hour, depending on your computer speed and the amount of data being stored. ✎ A copy of the entire hard drive image can be stored on another hard drive, on a network drive, or on recovery discs that you create. To back up your entire hard drive: 1. Click Start, click All Programs, click HP Backup & Recovery, and then click Backup & Recovery Manager. 2. Click Next. 3. In Windows Vista-Click Create or manage backups, and then click Next. In Windows XP-Click Backup to protect system settings and important data files, and then click Next. 4. In Windows Vista-Click Create or manage Entire Drive Backups, and then click Next. In Windows XP-Click Back up entire hard drive, and then click Next. 5. Follow the on-screen instructions. 14 Getting Started
-
 1
1 -
2
-
3
-
4
-
5
-
6
-
7
-
8
-
 9
9 -
 10
10 -
 11
11 -
 12
12 -
 13
13 -
 14
14 -
 15
15 -
 16
16
 |
 |
