HP 8000 Hardware Reference Guide - HP Compaq 8000 Elite Convertible Minitower - Page 59
C-7, Retrieving the Front Bezel Security Screw
 |
UPC - 884420665106
View all HP 8000 manuals
Add to My Manuals
Save this manual to your list of manuals |
Page 59 highlights
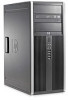
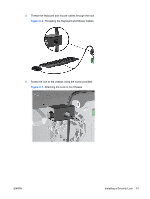
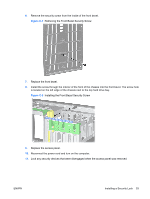
6. Remove the security screw from the inside of the front bezel. Figure C-7 Retrieving the Front Bezel Security Screw 7. Replace the front bezel. 8. Install the screw through the interior of the front of the chassis into the front bezel. The screw hole is located on the left edge of the chassis next to the top hard drive bay. Figure C-8 Installing the Front Bezel Security Screw 9. Replace the access panel. 10. Reconnect the power cord and turn on the computer. 11. Lock any security devices that were disengaged when the access panel was removed. ENWW Installing a Security Lock 53
-
 1
1 -
2
-
3
-
4
-
5
-
6
-
7
-
8
-
9
-
10
-
11
-
12
-
13
-
14
-
15
-
16
-
17
-
18
-
19
-
20
-
21
-
22
-
23
-
24
-
25
-
26
-
27
-
28
-
29
-
30
-
31
-
32
-
33
-
34
-
35
-
36
-
37
-
38
-
39
-
40
-
41
-
42
-
43
-
44
-
45
-
46
-
47
-
48
-
49
-
50
-
51
-
52
-
53
-
 54
54 -
 55
55 -
 56
56 -
 57
57 -
 58
58 -
 59
59 -
 60
60 -
 61
61 -
 62
62 -
 63
63 -
 64
64
 |
 |

6.
Remove the security screw from the inside of the front bezel.
Figure C-7
Retrieving the Front Bezel Security Screw
7.
Replace the front bezel.
8.
Install the screw through the interior of the front of the chassis into the front bezel. The screw hole
is located on the left edge of the chassis next to the top hard drive bay.
Figure C-8
Installing the Front Bezel Security Screw
9.
Replace the access panel.
10.
Reconnect the power cord and turn on the computer.
11.
Lock any security devices that were disengaged when the access panel was removed.
ENWW
Installing a Security Lock
53