HP 8350 Setup and Support Guide - Page 11
Step 5. Connect the USB cable, Step 6. Test the installation - scanner
 |
UPC - 829160967080
View all HP 8350 manuals
Add to My Manuals
Save this manual to your list of manuals |
Page 11 highlights
English Step 5. Connect the USB cable Caution If you are connecting the scanner to a Windows computer and you have not inserted HP CD 1 in the computer CD drive, do so before connecting the scanner to the computer. Use the USB cable that came with the scanner to connect the scanner to the computer. Step 6. Test the installation 1. Place a single document in the ADF or on the scanner glass. 2. Make sure that a printer is attached to the computer or is available over the network. 3. Press the Copy ( ) button. 4. A copy is sent to the default printer. If a printer is not attached to the computer, an error message is displayed. If an error message is displayed, see Troubleshooting on page 21. Setup and Support Guide 9
-
 1
1 -
2
-
3
-
4
-
5
-
 6
6 -
 7
7 -
 8
8 -
 9
9 -
 10
10 -
 11
11 -
 12
12 -
 13
13 -
 14
14 -
 15
15 -
 16
16 -
17
-
18
-
19
-
20
-
21
-
22
-
23
-
24
-
25
-
26
-
27
-
28
-
29
-
30
-
31
-
32
-
33
-
34
-
35
-
36
-
37
-
38
-
39
-
40
-
41
-
42
-
43
-
44
-
45
-
46
-
47
-
48
-
49
-
50
-
51
-
52
-
53
-
54
-
55
-
56
-
57
-
58
-
59
-
60
-
61
-
62
-
63
-
64
-
65
-
66
-
67
-
68
-
69
-
70
-
71
-
72
-
73
-
74
-
75
-
76
-
77
-
78
-
79
-
80
-
81
-
82
-
83
-
84
-
85
-
86
-
87
-
88
-
89
-
90
-
91
-
92
-
93
-
94
-
95
-
96
-
97
-
98
-
99
-
100
-
101
-
102
-
103
-
104
-
105
-
106
-
107
-
108
-
109
-
110
-
111
-
112
-
113
-
114
-
115
-
116
-
117
-
118
-
119
-
120
-
121
-
122
-
123
-
124
-
125
-
126
-
127
-
128
-
129
-
130
-
131
-
132
-
133
-
134
-
135
-
136
-
137
-
138
-
139
-
140
 |
 |
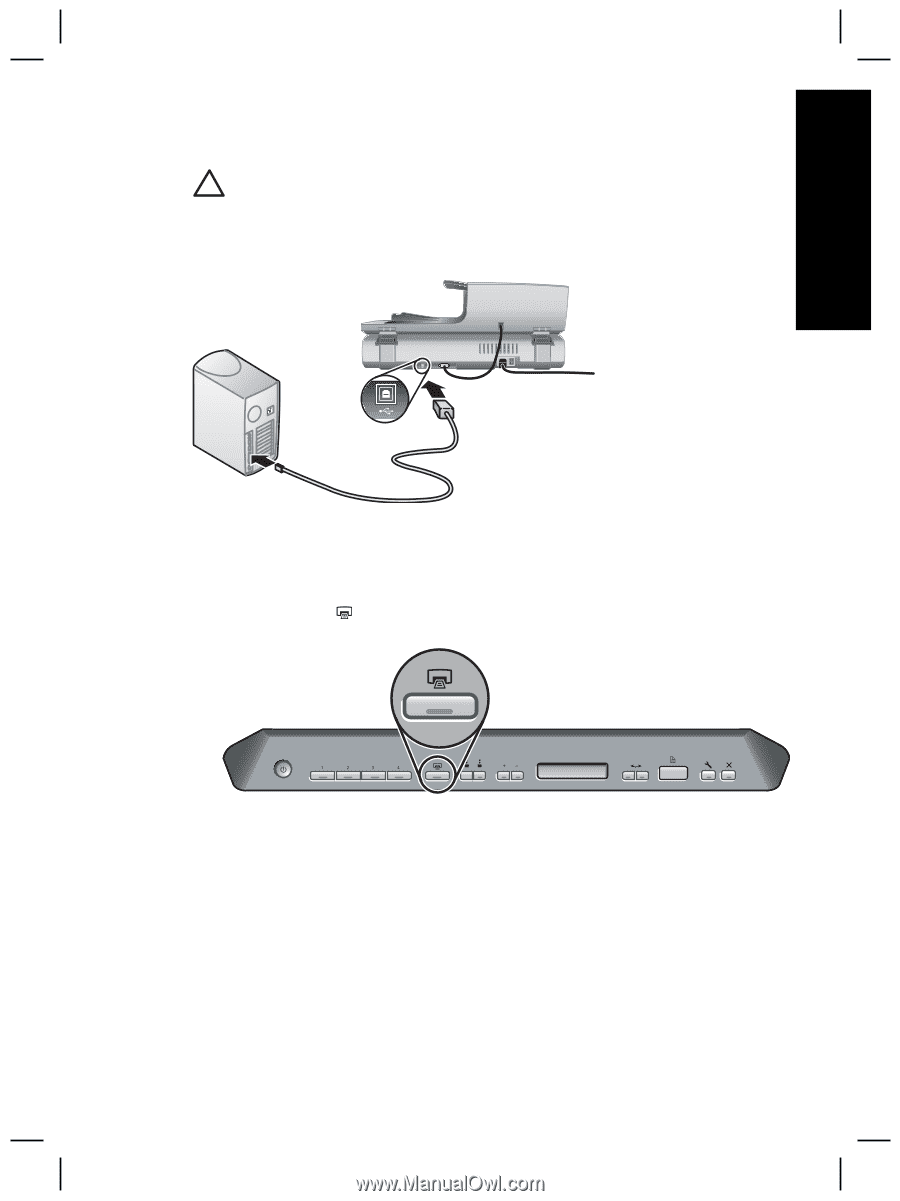
Step 5. Connect the USB cable
Caution
If you are connecting the scanner to a Windows computer and you have
not inserted HP CD 1 in the computer CD drive, do so before connecting the
scanner to the computer.
Use the USB cable that came with the scanner to connect the scanner to the computer.
Step 6. Test the installation
1.
Place a single document in the ADF or on the scanner glass.
2.
Make sure that a printer is attached to the computer or is available over the network.
3.
Press the
Copy
(
) button.
4.
A copy is sent to the default printer. If a printer is not attached to the computer, an
error message is displayed.
If an error message is displayed, see
Troubleshooting
on page 21.
Setup and Support Guide
9
English