HP B8550 Creative Guide - Page 4
Photo Books - photosmart photo printer
 |
UPC - 884420048510
View all HP B8550 manuals
Add to My Manuals
Save this manual to your list of manuals |
Page 4 highlights
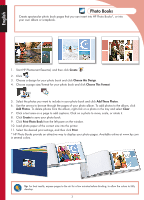
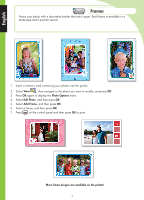
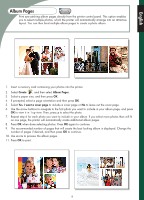
English Photo Books Create spectacular photo book pages that you can insert into HP Photo Books*, or into your own album or scrapbook. 1. Start HP Photosmart Essential, and then click Create . 2. Click . 3. Choose a design for your photo book and click Choose this Design. 4. Choose a page size/format for your photo book and click Choose This Format. 5. Select the photos you want to include in your photo book and click Add These Photos. 6. Use the arrows to browse through the pages of your photo album. To add photos to the album, click Add Photos. To delete photos from the album, right-click on a photo in the tray and select Clear. 7. Click a text area on a page to add captions. Click on a photo to move, scale, or rotate it. 8. Click Create to save your photo book. 9. Click Print Photo Book from the left pane on the window. 10. Load photo paper of the correct size into the printer. 11. Select the desired print settings, and then click Print. * HP Photo Books provide an attractive way to display your photo pages. Available online at www.hp.com in several colors. Tip: For best results, expose pages to the air for a few minutes before binding, to allow the colors to fully develop. 3
-
 1
1 -
 2
2 -
 3
3 -
 4
4 -
 5
5 -
 6
6 -
 7
7 -
 8
8 -
 9
9 -
 10
10 -
11
-
12
-
13
-
14
-
15
-
16
-
17
-
18
-
19
-
20
-
21
-
22
-
23
-
24
-
25
-
26
-
27
-
28
 |
 |