HP Brocade 8/12c Brocade Web Tools Administrator's Guide v6.1.0 (53-1000606-02 - Page 57
Viewing and printing a switch report, Rebooting the switch, Performing a fast boot
 |
View all HP Brocade 8/12c manuals
Add to My Manuals
Save this manual to your list of manuals |
Page 57 highlights
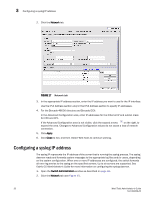
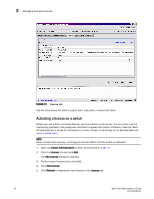
Rebooting the switch 3 Viewing and printing a switch report The switch report includes the following information: • A list of switches in the fabric • Switch configuration parameters • A list of ISLs and ports • Name Server information • Zoning information • SFP serial ID information To view or print a report: 1. Open the Switch Administration window as described on page 31. 2. Click the Switch tab. 3. Click View Report. 4. In the new window that displays the report, view or print the report using your browser. Rebooting the switch When you reboot the switch, the reboot takes effect immediately. Ensure that there is no traffic or other management on the switch, as traffic is interrupted during the reboot; however, frames are not dropped. Be sure to save your changes before the reboot, as any changes that were not saved are lost. Performing a fast boot A fast boot reduces boot time significantly by bypassing the power-on self test (POST). 1. Open the Switch Administration window as described on page 31. 2. Click the Fastboot button. 3. On the Fastboot Confirmation window, click Yes to continue. 4. Click Apply. Performing a reboot Use the following procedure to reboot the CP and execute the normal power-on booting sequence. 1. Open the Switch Administration window as described on page 31. 2. Click the Reboot button. 3. On the Reboot Confirmation window, click Yes to continue. 4. Click Apply. Web Tools Administrator's Guide 37 53-1000606-02
-
 1
1 -
2
-
3
-
4
-
5
-
6
-
7
-
8
-
9
-
10
-
11
-
12
-
13
-
14
-
15
-
16
-
17
-
18
-
19
-
20
-
21
-
22
-
23
-
24
-
25
-
26
-
27
-
28
-
29
-
30
-
31
-
32
-
33
-
34
-
35
-
36
-
37
-
38
-
39
-
40
-
41
-
42
-
43
-
44
-
45
-
46
-
47
-
48
-
49
-
50
-
51
-
 52
52 -
 53
53 -
 54
54 -
 55
55 -
 56
56 -
 57
57 -
 58
58 -
 59
59 -
 60
60 -
 61
61 -
 62
62 -
63
-
64
-
65
-
66
-
67
-
68
-
69
-
70
-
71
-
72
-
73
-
74
-
75
-
76
-
77
-
78
-
79
-
80
-
81
-
82
-
83
-
84
-
85
-
86
-
87
-
88
-
89
-
90
-
91
-
92
-
93
-
94
-
95
-
96
-
97
-
98
-
99
-
100
-
101
-
102
-
103
-
104
-
105
-
106
-
107
-
108
-
109
-
110
-
111
-
112
-
113
-
114
-
115
-
116
-
117
-
118
-
119
-
120
-
121
-
122
-
123
-
124
-
125
-
126
-
127
-
128
-
129
-
130
-
131
-
132
-
133
-
134
-
135
-
136
-
137
-
138
-
139
-
140
-
141
-
142
-
143
-
144
-
145
-
146
-
147
-
148
-
149
-
150
-
151
-
152
-
153
-
154
-
155
-
156
-
157
-
158
-
159
-
160
-
161
-
162
-
163
-
164
-
165
-
166
-
167
-
168
-
169
-
170
-
171
-
172
-
173
-
174
-
175
-
176
-
177
-
178
-
179
-
180
-
181
-
182
-
183
-
184
-
185
-
186
-
187
-
188
-
189
-
190
-
191
-
192
-
193
-
194
-
195
-
196
-
197
-
198
-
199
-
200
-
201
-
202
-
203
-
204
-
205
-
206
-
207
-
208
-
209
-
210
-
211
-
212
-
213
-
214
-
215
-
216
-
217
-
218
-
219
-
220
-
221
-
222
-
223
-
224
-
225
-
226
-
227
-
228
-
229
-
230
-
231
-
232
-
233
-
234
-
235
-
236
-
237
-
238
-
239
-
240
-
241
-
242
-
243
-
244
-
245
-
246
-
247
-
248
-
249
-
250
-
251
-
252
-
253
-
254
-
255
-
256
-
257
-
258
-
259
-
260
-
261
-
262
-
263
-
264
-
265
 |
 |