HP Cluster Platform Hardware Kits v2010 Linux Clusters QsNetII Cable Managemen - Page 8
Securing the Rear Top Bracket
 |
View all HP Cluster Platform Hardware Kits v2010 manuals
Add to My Manuals
Save this manual to your list of manuals |
Page 8 highlights
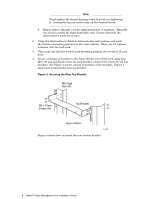
Note Hand-tighten the thread-forming screw to avoid overtightening it. Overtightening can easily strip out the formed thread. d. Repeat steps a through c for the right-hand plate, if required. (Typically, you need to install the right-hand plate only if more than half the interconnect's ports are in use.) 2. Using the information in Table 2, determine the rack location and mark the fastener mounting positions on the rack columns. There are 16 fastener locations, four for each rack. 3. Clip a cage nut into the back of each mounting position, for a total of 16 cage nuts. 4. Secure each pair of brackets to the front and the rear of the rack using four M6 x 16 mm pan-head screws for each bracket, a total of 16 screws for all four brackets. See Figure 1 for the correct orientation of the brackets. Figure 3 shows how to mount the rear top bracket. Figure 3: Securing the Rear Top Bracket M6 Cage Nut (4X) M6 x 16mm Screw (4X) Top Bracket Rear of Rack zk-2080 Figure 4 shows how to mount the rear bottom bracket. 6 QsNetII Cable Management Kit Installation Guide
-
 1
1 -
2
-
 3
3 -
 4
4 -
 5
5 -
 6
6 -
 7
7 -
 8
8 -
 9
9 -
 10
10 -
 11
11 -
 12
12 -
 13
13
 |
 |
