HP Cluster Platform Hardware Kits v2010 Linux Clusters QsNetII Cable Managemen - Page 9
Securing the Rear Bottom Bracket, Locking the Retainer Pin
 |
View all HP Cluster Platform Hardware Kits v2010 manuals
Add to My Manuals
Save this manual to your list of manuals |
Page 9 highlights
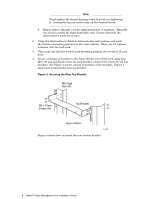
Figure 4: Securing the Rear Bottom Bracket M6 Cage Nut (4X) M6 x 16mm Screw (4X) Rear of Rack zk-2081 5. Prepare the eight cable support bars for installation by retracting the spring-loaded retainer pin at the top of each bar. Pull the pin down and rotate it until the pin locks in the retracted position as shown in Figure 5. Figure 5: Locking the Retainer Pin X1 Pin in Closed Y Position Pin in Open Position zk-2082 6. Orient a cable support bar so that the cable support hooks are on the right-hand side. Place the bottom of the bar between the flanges on the lower bracket as shown in Figure 6, callout 1. Insert a pivot pin and secure it loosely a few turns with your fingers as shown in shown in Figure 6, callout 2. QsNetII Cable Management Kit Installation Guide 7
-
 1
1 -
2
-
3
-
 4
4 -
 5
5 -
 6
6 -
 7
7 -
 8
8 -
 9
9 -
 10
10 -
 11
11 -
 12
12 -
 13
13
 |
 |
