HP Color LaserJet 5550 HP Color LaserJet 5550 series - User Guide - Page 94
Configuring input trays, Configuring trays when the printer gives a prompt - jamming when duplexing
 |
View all HP Color LaserJet 5550 manuals
Add to My Manuals
Save this manual to your list of manuals |
Page 94 highlights
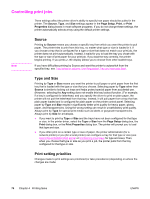
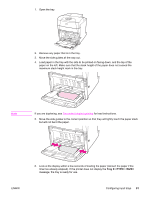
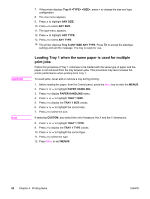
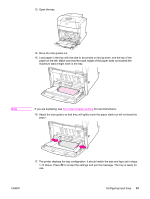
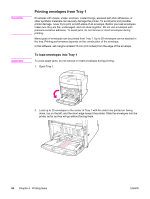
Configuring input trays Note Note Note The HP Color LaserJet 5550 series printer allows you to configure input trays by type and size. You can load different paper in the printer input trays and then request paper by type or size. If you have used previous HP Color LaserJet printers, you might be accustomed to configuring Tray 1 to first mode or cassette mode. To mimic the settings for first mode, configure Tray 1 for Size =ANY and Type = ANY. The printer will pull paper from Tray 1 first when the print job does not specify another tray. This setting is recommended if you use different types or sizes of paper. To mimic the settings from cassette mode, set either the size or type for Tray 1 to a setting other than ANY. This setting is recommended if you are using the same size and type of paper in Tray 1. If you use two-sided printing (duplex), be sure that the paper loaded meets the specifications for duplex printing. (See Supported paper weights and sizes.) The instructions below are to configure the trays at the printer control panel. You can also configure the trays from your computer by accessing the embedded Web server. See Using the embedded Web server. Letter and A4 sizes can be loaded with the long-edge or short-edge leading into the printer. Long-edge first is the preferred orientation. Long-edge feed gives greater throughput, and lower consumable usage. Short-edge feed is called the rotated orientation, and is identified in the trays as LTR-R and A4-R. Short-edge feed can be useful when printing on media with special features, such as perforations or windows. Note Configuring trays when the printer gives a prompt In the following situations, the printer automatically prompts you to configure the tray for type and size: ● when you load paper into the tray, on tray close you will see Tray X . To change the type or size, press . ● when you specify a particular tray or media type for a print job through the printer driver or a software application and the tray is not configured to match the print job's settings. You will see LOAD TRAY X . The control panel displays this message: LOAD TRAY X , to change size or type, press . The instructions below explain how to configure the tray after the prompt appears. The prompt does not appear if you are printing from Tray 1 and if Tray 1 is configured for ANY SIZE and ANY TYPE. CAUTION Loading Tray 1 for one-time use Follow this procedure if the tray is usually left empty and is used for a variety of sizes or types of paper. To avoid jams, never add or remove a tray during printing. 80 Chapter 4 Printing tasks ENWW
-
 1
1 -
2
-
3
-
4
-
5
-
6
-
7
-
8
-
9
-
10
-
11
-
12
-
13
-
14
-
15
-
16
-
17
-
18
-
19
-
20
-
21
-
22
-
23
-
24
-
25
-
26
-
27
-
28
-
29
-
30
-
31
-
32
-
33
-
34
-
35
-
36
-
37
-
38
-
39
-
40
-
41
-
42
-
43
-
44
-
45
-
46
-
47
-
48
-
49
-
50
-
51
-
52
-
53
-
54
-
55
-
56
-
57
-
58
-
59
-
60
-
61
-
62
-
63
-
64
-
65
-
66
-
67
-
68
-
69
-
70
-
71
-
72
-
73
-
74
-
75
-
76
-
77
-
78
-
79
-
80
-
81
-
82
-
83
-
84
-
85
-
86
-
87
-
88
-
 89
89 -
 90
90 -
 91
91 -
 92
92 -
 93
93 -
 94
94 -
 95
95 -
 96
96 -
 97
97 -
 98
98 -
 99
99 -
100
-
101
-
102
-
103
-
104
-
105
-
106
-
107
-
108
-
109
-
110
-
111
-
112
-
113
-
114
-
115
-
116
-
117
-
118
-
119
-
120
-
121
-
122
-
123
-
124
-
125
-
126
-
127
-
128
-
129
-
130
-
131
-
132
-
133
-
134
-
135
-
136
-
137
-
138
-
139
-
140
-
141
-
142
-
143
-
144
-
145
-
146
-
147
-
148
-
149
-
150
-
151
-
152
-
153
-
154
-
155
-
156
-
157
-
158
-
159
-
160
-
161
-
162
-
163
-
164
-
165
-
166
-
167
-
168
-
169
-
170
-
171
-
172
-
173
-
174
-
175
-
176
-
177
-
178
-
179
-
180
-
181
-
182
-
183
-
184
-
185
-
186
-
187
-
188
-
189
-
190
-
191
-
192
-
193
-
194
-
195
-
196
-
197
-
198
-
199
-
200
-
201
-
202
-
203
-
204
-
205
-
206
-
207
-
208
-
209
-
210
-
211
-
212
-
213
-
214
-
215
-
216
-
217
-
218
-
219
-
220
-
221
-
222
-
223
-
224
-
225
-
226
-
227
-
228
-
229
-
230
-
231
-
232
-
233
-
234
-
235
-
236
-
237
-
238
-
239
-
240
-
241
-
242
-
243
-
244
-
245
-
246
-
247
-
248
-
249
-
250
-
251
-
252
-
253
-
254
-
255
-
256
-
257
-
258
-
259
-
260
-
261
-
262
-
263
-
264
-
265
-
266
-
267
-
268
-
269
-
270
-
271
-
272
-
273
-
274
-
275
-
276
-
277
-
278
-
279
-
280
-
281
-
282
-
283
-
284
-
285
-
286
-
287
-
288
-
289
-
290
-
291
-
292
-
293
-
294
 |
 |