HP Color LaserJet 9500 Service Manual - Page 373
Leading Edge Up=off/on
 |
View all HP Color LaserJet 9500 manuals
Add to My Manuals
Save this manual to your list of manuals |
Page 373 highlights
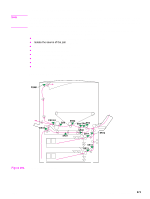
Note Leading edge The leading edge settings are used to compensate for poor transfer, missing toner, discharge marks, and mottled appearance on the leading edge. Try setting the printer to LEADING EDGE DOWN first. Depending on the type of media, you might get better results setting LEADING EDGE UP to ON. Switching LEADING EDGE DOWN and LEADING EDGE UP to ON decreases the T2 leading edge bias one step from nominal. The settings include LEADING EDGE DOWN=OFF/ON (default value is OFF) and LEADING EDGE UP=OFF/ON (default value is OFF). 1 Press to open the menus. 2 Use or to scroll to CONFIGURE DEVICE, and then press . 3 Use or to scroll to OPTIMIZE, and then press . 4 Use or to scroll to LEADING EDGE DOWN/UP, and then press . High coverage 1 The HP color LaserJet 9500 implements a very fine yellow dot pattern that eliminates most banding associated with a dry EP process. The dot patterns are controlled by the high coverage 1 and high coverage 2 settings. The default value is OFF for high coverage 1, high coverage 2, and high coverage 3. High coverage 1 and high coverage 2 are not mutually exclusive. If both items are turned on, the yellow dots turn off. High coverage 1 is designed for customers to turn off the yellow dot pattern. Perform the following steps to set high coverage 1: 1 Press to open the menus. 2 Use or to scroll to CONFIGURE DEVICE, and then press . 3 Use or to scroll to OPTIMIZE, and then press . 4 Use or to scroll to HIGH COVERAGE 1, and then press . The settings include: z OFF: The yellow dots are in a 10-by-10 mm pattern for half-speed printing, and an 8-by-8 mm pattern for full-speed printing. z ON: The yellow dots are off. High coverage 2 High coverage 2 is designed to reduce 47 mm bands in half-speed printing modes. If a line reoccurs every 47 mm from the start of a strip of color in half-speed printing modes, turn the item to ON. Otherwise, leave the item OFF. Perform the following steps to set high coverage 2: 1 Press to open the menus. 2 Use or to scroll to CONFIGURE DEVICE, and then press . 3 Use or to scroll to OPTIMIZE, and then press . 4 Use or to scroll to HIGH COVERAGE 2, and then press . The settings include: z OFF: The yellow dots are in a 10-by-10 mm pattern for half-speed printing, and an 8-by-8 mm pattern for full-speed printing. z ON: The yellow dots are in an 8-by-8 mm pattern for half-speed printing and full-speed printing. ENWW Chapter 7 Troubleshooting 371
-
 1
1 -
2
-
3
-
4
-
5
-
6
-
7
-
8
-
9
-
10
-
11
-
12
-
13
-
14
-
15
-
16
-
17
-
18
-
19
-
20
-
21
-
22
-
23
-
24
-
25
-
26
-
27
-
28
-
29
-
30
-
31
-
32
-
33
-
34
-
35
-
36
-
37
-
38
-
39
-
40
-
41
-
42
-
43
-
44
-
45
-
46
-
47
-
48
-
49
-
50
-
51
-
52
-
53
-
54
-
55
-
56
-
57
-
58
-
59
-
60
-
61
-
62
-
63
-
64
-
65
-
66
-
67
-
68
-
69
-
70
-
71
-
72
-
73
-
74
-
75
-
76
-
77
-
78
-
79
-
80
-
81
-
82
-
83
-
84
-
85
-
86
-
87
-
88
-
89
-
90
-
91
-
92
-
93
-
94
-
95
-
96
-
97
-
98
-
99
-
100
-
101
-
102
-
103
-
104
-
105
-
106
-
107
-
108
-
109
-
110
-
111
-
112
-
113
-
114
-
115
-
116
-
117
-
118
-
119
-
120
-
121
-
122
-
123
-
124
-
125
-
126
-
127
-
128
-
129
-
130
-
131
-
132
-
133
-
134
-
135
-
136
-
137
-
138
-
139
-
140
-
141
-
142
-
143
-
144
-
145
-
146
-
147
-
148
-
149
-
150
-
151
-
152
-
153
-
154
-
155
-
156
-
157
-
158
-
159
-
160
-
161
-
162
-
163
-
164
-
165
-
166
-
167
-
168
-
169
-
170
-
171
-
172
-
173
-
174
-
175
-
176
-
177
-
178
-
179
-
180
-
181
-
182
-
183
-
184
-
185
-
186
-
187
-
188
-
189
-
190
-
191
-
192
-
193
-
194
-
195
-
196
-
197
-
198
-
199
-
200
-
201
-
202
-
203
-
204
-
205
-
206
-
207
-
208
-
209
-
210
-
211
-
212
-
213
-
214
-
215
-
216
-
217
-
218
-
219
-
220
-
221
-
222
-
223
-
224
-
225
-
226
-
227
-
228
-
229
-
230
-
231
-
232
-
233
-
234
-
235
-
236
-
237
-
238
-
239
-
240
-
241
-
242
-
243
-
244
-
245
-
246
-
247
-
248
-
249
-
250
-
251
-
252
-
253
-
254
-
255
-
256
-
257
-
258
-
259
-
260
-
261
-
262
-
263
-
264
-
265
-
266
-
267
-
268
-
269
-
270
-
271
-
272
-
273
-
274
-
275
-
276
-
277
-
278
-
279
-
280
-
281
-
282
-
283
-
284
-
285
-
286
-
287
-
288
-
289
-
290
-
291
-
292
-
293
-
294
-
295
-
296
-
297
-
298
-
299
-
300
-
301
-
302
-
303
-
304
-
305
-
306
-
307
-
308
-
309
-
310
-
311
-
312
-
313
-
314
-
315
-
316
-
317
-
318
-
319
-
320
-
321
-
322
-
323
-
324
-
325
-
326
-
327
-
328
-
329
-
330
-
331
-
332
-
333
-
334
-
335
-
336
-
337
-
338
-
339
-
340
-
341
-
342
-
343
-
344
-
345
-
346
-
347
-
348
-
349
-
350
-
351
-
352
-
353
-
354
-
355
-
356
-
357
-
358
-
359
-
360
-
361
-
362
-
363
-
364
-
365
-
366
-
367
-
 368
368 -
 369
369 -
 370
370 -
 371
371 -
 372
372 -
 373
373 -
 374
374 -
 375
375 -
 376
376 -
 377
377 -
 378
378 -
379
-
380
-
381
-
382
-
383
-
384
-
385
-
386
-
387
-
388
-
389
-
390
-
391
-
392
-
393
-
394
-
395
-
396
-
397
-
398
-
399
-
400
-
401
-
402
-
403
-
404
-
405
-
406
-
407
-
408
-
409
-
410
-
411
-
412
-
413
-
414
-
415
-
416
-
417
-
418
-
419
-
420
-
421
-
422
-
423
-
424
-
425
-
426
-
427
-
428
-
429
-
430
-
431
-
432
-
433
-
434
-
435
-
436
-
437
-
438
-
439
-
440
-
441
-
442
-
443
-
444
-
445
-
446
-
447
-
448
-
449
-
450
-
451
-
452
-
453
-
454
-
455
-
456
-
457
-
458
-
459
-
460
-
461
-
462
-
463
-
464
-
465
-
466
-
467
-
468
-
469
-
470
-
471
-
472
-
473
-
474
-
475
-
476
-
477
-
478
-
479
-
480
-
481
-
482
-
483
-
484
-
485
-
486
-
487
-
488
-
489
-
490
-
491
-
492
-
493
-
494
-
495
-
496
-
497
-
498
-
499
-
500
-
501
-
502
-
503
-
504
-
505
-
506
-
507
-
508
-
509
-
510
-
511
-
512
-
513
-
514
-
515
-
516
-
517
-
518
-
519
-
520
-
521
-
522
-
523
-
524
-
525
-
526
-
527
-
528
-
529
-
530
-
531
-
532
-
533
-
534
-
535
-
536
 |
 |