HP Cp1700ps HP CP 1700 Series - (English) User's Guide - Page 15
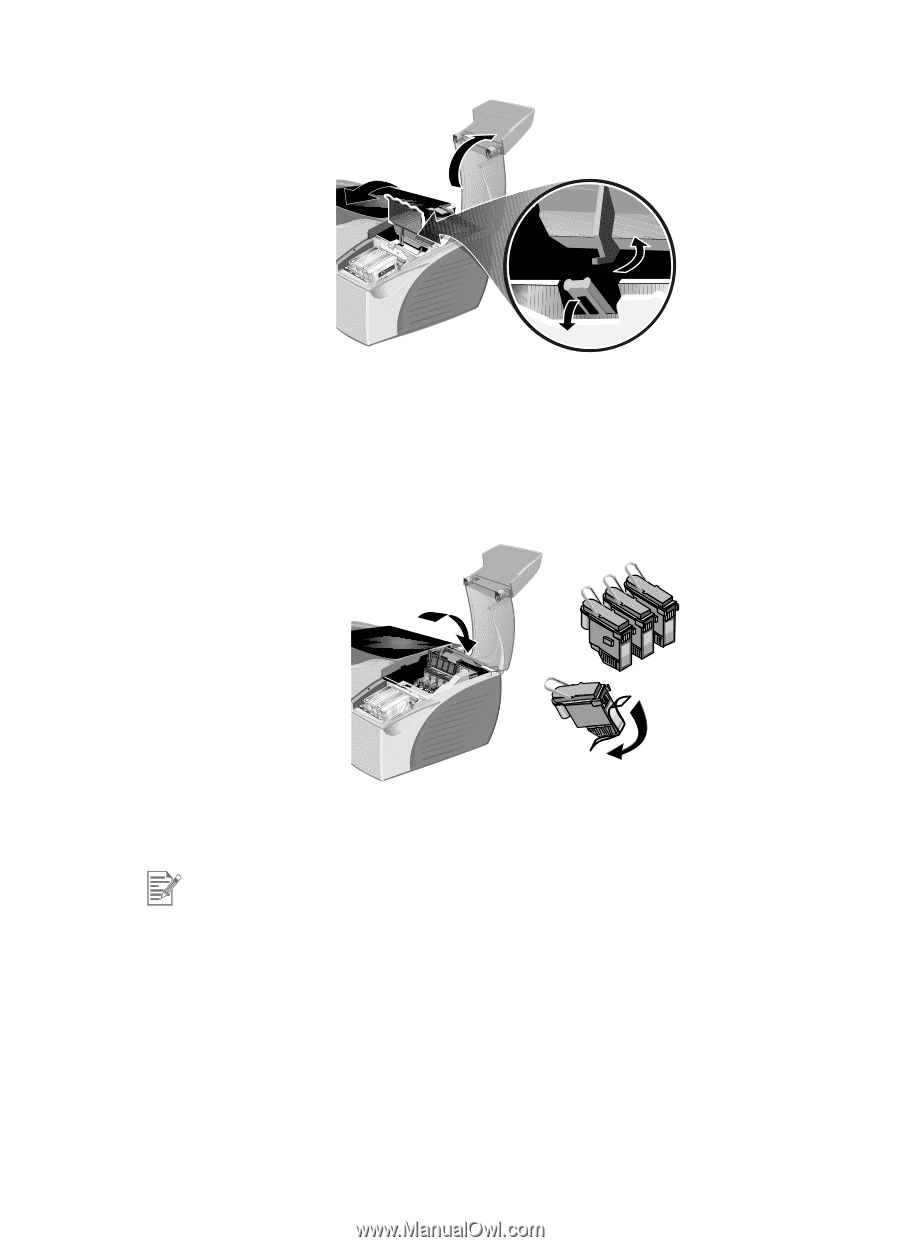
Lift the printhead access latch and bring it forward. Hook
 |
View all HP Cp1700ps manuals
Add to My Manuals
Save this manual to your list of manuals |
Page 15 highlights
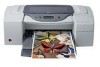
3 Lift and push the printhead access latch toward the back of the printer. 4 Remove each printhead from its package. Remove the protective film from each printhead. ENWW 5 Insert each printhead into its own color-coded socket. The color sequence of the printheads does not correspond to the color sequence of the ink cartridges. 6 Press firmly on each printhead to ensure proper contact after installation. 7 Lift the printhead access latch and bring it forward. Hook the carriage lock to the latch and then push the latch backwards until it is in its original position. You will have to use some force to close the printhead access latch. If the printhead access latch will not close, ensure that the printheads are seated properly by pushing down firmly on each printhead. 8 Close the printhead cover and the ink cartridge cover. 2-9
-
 1
1 -
2
-
3
-
4
-
5
-
6
-
7
-
8
-
9
-
 10
10 -
 11
11 -
 12
12 -
 13
13 -
 14
14 -
 15
15 -
 16
16 -
 17
17 -
 18
18 -
 19
19 -
 20
20 -
21
-
22
-
23
-
24
-
25
-
26
-
27
-
28
-
29
-
30
-
31
-
32
-
33
-
34
-
35
-
36
-
37
-
38
-
39
-
40
-
41
-
42
-
43
-
44
-
45
-
46
-
47
-
48
-
49
-
50
-
51
-
52
-
53
-
54
-
55
-
56
-
57
-
58
-
59
-
60
-
61
-
62
-
63
-
64
-
65
-
66
-
67
-
68
-
69
-
70
-
71
-
72
-
73
-
74
-
75
-
76
-
77
-
78
-
79
-
80
-
81
-
82
-
83
-
84
-
85
-
86
-
87
-
88
 |
 |