HP Deskjet 5850 HP Deskjet 5800 Series printer - (English) User Guide - Page 65
installing the printer on a wireless network, software installation
 |
View all HP Deskjet 5850 manuals
Add to My Manuals
Save this manual to your list of manuals |
Page 65 highlights
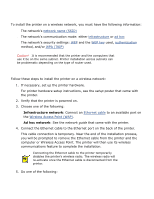
installing the printer on a wireless network To install the printer on a wireless network, you must have the following information: q The network's network name (SSID) q The network's communication mode: either infrastructure or ad hoc q The network's security settings: WEP and the WEP key used, authentication method, and/or WPA (TKIP) Caution! It is recommended that the printer and the computers that use it be on the same subnet. Printer installation across subnets can be problematic depending on the type of router used. software installation Follow these steps to install the printer on a wireless network: 1. If necessary, set up the printer hardware. For printer hardware setup instructions, see the setup poster that came with the printer. 2. Verify that the printer is powered on. 3. Choose one of the following: r Infrastructure network: Connect an Ethernet cable to an available port on the Wireless Access Point (WAP). r Ad hoc network: See the network guide that came with the printer. 4. Connect the Ethernet cable to the Ethernet port on the back of the printer. This cable connection is temporary. Near the end of the installation process, you will be prompted to remove the Ethernet cable from the printer and the computer or Wireless Access Point. The printer will then use its wireless communications feature to complete the installation. Connecting the Ethernet cable to the printer temporarily disables the printer's wireless radio. The wireless radio will re-activate once the Ethernet cable is disconnected from the printer. 5. Do one of the following:
-
 1
1 -
2
-
3
-
4
-
5
-
6
-
7
-
8
-
9
-
10
-
11
-
12
-
13
-
14
-
15
-
16
-
17
-
18
-
19
-
20
-
21
-
22
-
23
-
24
-
25
-
26
-
27
-
28
-
29
-
30
-
31
-
32
-
33
-
34
-
35
-
36
-
37
-
38
-
39
-
40
-
41
-
42
-
43
-
44
-
45
-
46
-
47
-
48
-
49
-
50
-
51
-
52
-
53
-
54
-
55
-
56
-
57
-
58
-
59
-
 60
60 -
 61
61 -
 62
62 -
 63
63 -
 64
64 -
 65
65 -
 66
66 -
 67
67 -
 68
68 -
 69
69 -
 70
70 -
71
-
72
-
73
-
74
-
75
-
76
-
77
-
78
-
79
-
80
-
81
-
82
-
83
-
84
-
85
-
86
-
87
-
88
-
89
-
90
-
91
-
92
-
93
-
94
-
95
-
96
-
97
-
98
-
99
-
100
-
101
-
102
-
103
-
104
-
105
-
106
-
107
-
108
-
109
-
110
-
111
-
112
-
113
-
114
-
115
-
116
-
117
-
118
-
119
-
120
-
121
-
122
-
123
-
124
-
125
-
126
-
127
-
128
-
129
-
130
-
131
-
132
-
133
-
134
-
135
-
136
-
137
-
138
-
139
-
140
-
141
-
142
-
143
-
144
-
145
-
146
-
147
-
148
-
149
-
150
-
151
-
152
-
153
-
154
-
155
-
156
-
157
-
158
-
159
-
160
-
161
-
162
-
163
-
164
-
165
-
166
-
167
-
168
-
169
-
170
-
171
-
172
-
173
-
174
-
175
-
176
-
177
-
178
-
179
-
180
-
181
-
182
-
183
-
184
-
185
-
186
-
187
-
188
-
189
-
190
-
191
-
192
-
193
-
194
-
195
-
196
-
197
-
198
-
199
-
200
-
201
-
202
-
203
-
204
-
205
-
206
-
207
-
208
-
209
-
210
-
211
-
212
-
213
-
214
-
215
-
216
-
217
 |
 |
