HP Deskjet 9300 HP Deskjet 9300 series printer - (English) User Guide - Page 18
Printing on standard-sized paper, Edit Custom Sizes - driver for windows 7
 |
View all HP Deskjet 9300 manuals
Add to My Manuals
Save this manual to your list of manuals |
Page 18 highlights
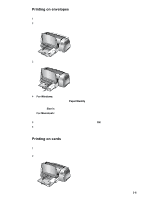
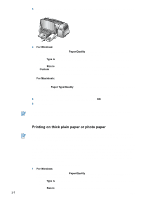
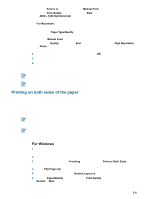
For Macintosh: • Select the size of your HP media (such as Letter or A4). • Open the Paper Type/Quality panel and select the appropriate HP media (such as HP Premium Inkjet Paper). • Select Tray 1. • Click the Quality tab and select Best. 4 Change any other print settings if necessary and click OK. 5 Print your document. Printing on standard-sized paper To print on standard-sized paper: 1 Insert a stack of paper, up to 19 mm (0.75 in.) or 150 sheets, print-side down along the right side of the main paper tray, until it stops. 2 Slide the paper width and length adjusters in until they stop at the edges of the paper. 3 In the printer driver, change the necessary print settings and click OK. (For instructions on accessing the printer driver, see "Changing print settings.") 4 Print your document. Your application might override print settings. Check Page Setup or Print Setup in your application to change default paper sizes. Printing on custom-sized paper To print on custom-sized paper: The paper width must be between 89 mm and 330 mm (3.5 in. and 13 in.); the paper length must be between 146 mm and 1,270 mm (5.75 in. and 50 in.). 1 Insert a stack of paper, up to 19 mm (0.75 in.) or 150 sheets, print-side down along the right side of the main paper tray, until it stops. 2 Slide the paper width and length adjusters in until they stop at the edges of the paper. 3 Before running your application, open the printer driver to set the desired custom paper size. (For instructions on accessing the printer driver, see "Changing print settings.") 4 For Windows: In the printer driver, click the Paper/Quality tab and do the following: • Click the Custom button next to the Size is drop-down list. The Custom Paper Size dialog box appears. • Under Paper Size, type values in the Width and Length boxes. You can save the settings using any of the predefined names if desired. Click OK. • In the Source is drop-down list, select Tray 1. For Macintosh: • Click the File menu and then click Page Setup. • Select Edit Custom Page Sizes from Page Size. • Under Edit Paper Sizes, type values in the Width and Height boxes. You can save the settings using any of the predefined names if desired. Click Done. 5 Change any other print settings if necessary and click OK. 6 Run the application and print your document. 3-5 ENWW
-
 1
1 -
2
-
3
-
4
-
5
-
6
-
7
-
8
-
9
-
10
-
11
-
12
-
 13
13 -
 14
14 -
 15
15 -
 16
16 -
 17
17 -
 18
18 -
 19
19 -
 20
20 -
 21
21 -
 22
22 -
 23
23 -
24
-
25
-
26
-
27
-
28
-
29
-
30
-
31
-
32
-
33
-
34
-
35
-
36
-
37
-
38
-
39
-
40
-
41
-
42
-
43
-
44
-
45
-
46
-
47
-
48
-
49
-
50
 |
 |
