HP Deskjet 950/952c (English) Windows Connect * User's Guide - C6428-90035 - Page 17
HP print settings to choose, Guidelines to remember, HP Premium Plus Photo, Paper, Glossy
 |
View all HP Deskjet 950/952c manuals
Add to My Manuals
Save this manual to your list of manuals |
Page 17 highlights
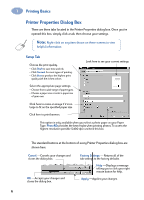
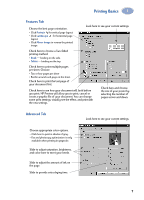
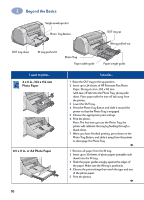
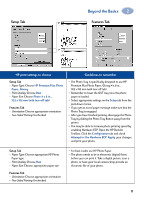
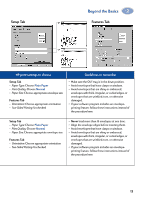
Setup Tab Beyond the Basics 2 Features Tab HP print settings to choose Setup Tab - Paper Type: Choose HP Premium Plus Photo Paper, Glossy - Print Quality: Choose Best - Paper Size: Choose Photo 4 x 6 in., 102 x 152 mm (with tear-off tab) Features Tab - Orientation: Choose appropriate orientation - Two-Sided Printing: Unchecked Guidelines to remember • The Photo Tray is specifically designed to use HP Premium Plus Photo Paper, Glossy 4 x 6 in., 102 x 152 mm (with tear-off tab). • Remember to lower the OUT tray once the photo paper is loaded. • Select appropriate settings on the Setup tab from the pull-down menus. • If you get an out of paper message make sure that the Photo Tray is engaged. • After you have finished printing, disengage the Photo Tray by sliding the Photo Tray Button away from the printer. • You may be able to increase photo printing speed by enabling Hardware ECP. Open the HP DeskJet Toolbox. Click the Configuration tab and check Attempt to Use Hardware ECP. Apply your changes and print your photo. Setup Tab - Paper Type: Choose appropriate HP Photo Paper type - Print Quality: Choose Best - Paper Size: Choose appropriate paper size Features Tab - Orientation: Choose appropriate orientation - Two-Sided Printing: Unchecked • For best results use HP Photo Paper. • The photo needs to be in electronic (digital) form, before you can print it. Take a digital picture, scan a photo, or have your local camera shop provide an electronic file of your photo. 11
-
 1
1 -
2
-
3
-
4
-
5
-
6
-
7
-
8
-
9
-
10
-
11
-
 12
12 -
 13
13 -
 14
14 -
 15
15 -
 16
16 -
 17
17 -
 18
18 -
 19
19 -
 20
20 -
 21
21 -
 22
22 -
23
-
24
-
25
-
26
-
27
-
28
-
29
-
30
-
31
-
32
-
33
-
34
-
35
-
36
-
37
-
38
-
39
-
40
-
41
-
42
-
43
-
44
-
45
-
46
-
47
-
48
-
49
-
50
-
51
-
52
-
53
-
54
-
55
-
56
-
57
-
58
-
59
-
60
-
61
-
62
-
63
-
64
-
65
-
66
-
67
-
68
-
69
-
70
-
71
-
72
-
73
-
74
 |
 |
