HP E427 User Guide - Page 17
Magnifying images, Selecting images for printing, Recording audio, Playback Menu, Magnify, Playback - software
 |
UPC - 882780503250
View all HP E427 manuals
Add to My Manuals
Save this manual to your list of manuals |
Page 17 highlights
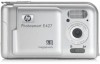
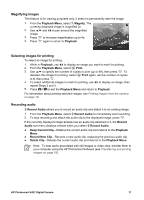
Magnifying images This feature is for viewing purposes only; it does not permanently alter the image. 1. From the Playback Menu, select Magnify. The currently displayed image is magnified 2x. 2. Use and to pan around the magnified image. 3. Press to increase magnification up to 4x. 4. Press again to return to Playback. Selecting images for printing To select an image for printing: 1. While in Playback, use to display an image you want to mark for printing. 2. From the Playback Menu, select Print. 3. Use to specify the number of copies to print (up to 99), then press . To deselect this image for printing, select Print again, set the number of copies to 0, then press . 4. To select additional images to mark for printing, use to display an image, then repeat Steps 2 and 3. 5. Press to exit the Playback Menu and return to Playback. For information about printing selected images, see Printing images from the camera on page 19. Recording audio Record Audio allows you to record an audio clip and attach it to an existing image. 1. From the Playback Menu, select Record Audio to immediately start recording. 2. To stop recording and attach the audio clip to the displayed image, press . If the currently displayed image already has an audio clip attached to it, the Record Audio sub-menu displays instead when you select Record Audio. ● Keep Current Clip-Retains the current audio clip and returns to the Playback Menu. ● Record New Clip-Records a new audio clip, replacing the previous audio clip. ● Delete Clip-Deletes the current audio clip and returns to the Playback Menu. Note To hear audio associated with still images or video clips, transfer them to your computer using the HP Photosmart Software (see Transferring and printing images on page 18). HP Photosmart E427 Digital Camera 17
-
 1
1 -
2
-
3
-
4
-
5
-
6
-
7
-
8
-
9
-
10
-
11
-
 12
12 -
 13
13 -
 14
14 -
 15
15 -
 16
16 -
 17
17 -
 18
18 -
 19
19 -
 20
20 -
 21
21 -
 22
22 -
23
-
24
-
25
-
26
-
27
-
28
-
29
-
30
-
31
-
32
 |
 |