HP ENVY TouchSmart 15-j119wm HP ENVY 15 Notebook PC and HP ENVY TouchSmart 15 - Page 99
crucial to the performance of the TouchPad., These washers are
 |
View all HP ENVY TouchSmart 15-j119wm manuals
Add to My Manuals
Save this manual to your list of manuals |
Page 99 highlights
2. Remove the TouchPad bracket (2). 3. Release the two pieces of grounding tape (1) that connect the TouchPad to the top cover. 4. Remove the four Phillips PM2.5×2.5 broad head screws (2) that secure the TouchPad to the top cover. NOTE: The second and third screws include two rubber washers (3). These washers are crucial to the performance of the TouchPad. 5. Lift the rear edge of the TouchPad (4) until it rests at an angle. Component replacement procedures 89
-
 1
1 -
2
-
3
-
4
-
5
-
6
-
7
-
8
-
9
-
10
-
11
-
12
-
13
-
14
-
15
-
16
-
17
-
18
-
19
-
20
-
21
-
22
-
23
-
24
-
25
-
26
-
27
-
28
-
29
-
30
-
31
-
32
-
33
-
34
-
35
-
36
-
37
-
38
-
39
-
40
-
41
-
42
-
43
-
44
-
45
-
46
-
47
-
48
-
49
-
50
-
51
-
52
-
53
-
54
-
55
-
56
-
57
-
58
-
59
-
60
-
61
-
62
-
63
-
64
-
65
-
66
-
67
-
68
-
69
-
70
-
71
-
72
-
73
-
74
-
75
-
76
-
77
-
78
-
79
-
80
-
81
-
82
-
83
-
84
-
85
-
86
-
87
-
88
-
89
-
90
-
91
-
92
-
93
-
 94
94 -
 95
95 -
 96
96 -
 97
97 -
 98
98 -
 99
99 -
 100
100 -
 101
101 -
 102
102 -
 103
103 -
 104
104 -
105
-
106
-
107
-
108
-
109
-
110
-
111
-
112
-
113
-
114
-
115
-
116
-
117
-
118
-
119
-
120
-
121
-
122
-
123
-
124
-
125
-
126
-
127
-
128
-
129
-
130
-
131
 |
 |

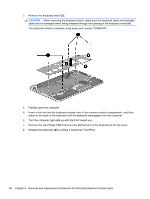
2.
Remove the TouchPad bracket
(2)
.
3.
Release the two pieces of grounding tape
(1)
that connect the TouchPad to the top cover.
4.
Remove the four Phillips PM2.5×2.5 broad head screws
(2)
that secure the TouchPad to the
top cover.
NOTE:
The second and third screws include two rubber washers
(3)
. These washers are
crucial to the performance of the TouchPad.
5.
Lift the rear edge of the TouchPad
(4)
until it rests at an angle.
Component replacement procedures
89