HP ENVY Ultrabook CTO 6t-1000 HP Envy 6 Maintenance and Service Guide - Page 73
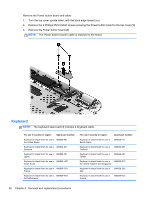
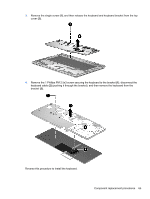
pushing it through the bracket, and then remove the keyboard from
 |
View all HP ENVY Ultrabook CTO 6t-1000 manuals
Add to My Manuals
Save this manual to your list of manuals |
Page 73 highlights
3. Remove the single screw (1), and then release the keyboard and keyboard bracket from the top cover (2). 4. Remove the 1 Phillips PM 2.5x3 screw securing the keyboard to the bracket (1), disconnect the keyboard cable (2) (pushing it through the bracket), and then remove the keyboard from the bracket (3). Reverse this procedure to install the keyboard. Component replacement procedures 65
-
 1
1 -
2
-
3
-
4
-
5
-
6
-
7
-
8
-
9
-
10
-
11
-
12
-
13
-
14
-
15
-
16
-
17
-
18
-
19
-
20
-
21
-
22
-
23
-
24
-
25
-
26
-
27
-
28
-
29
-
30
-
31
-
32
-
33
-
34
-
35
-
36
-
37
-
38
-
39
-
40
-
41
-
42
-
43
-
44
-
45
-
46
-
47
-
48
-
49
-
50
-
51
-
52
-
53
-
54
-
55
-
56
-
57
-
58
-
59
-
60
-
61
-
62
-
63
-
64
-
65
-
66
-
67
-
 68
68 -
 69
69 -
 70
70 -
 71
71 -
 72
72 -
 73
73 -
 74
74 -
 75
75 -
 76
76 -
 77
77 -
 78
78 -
79
-
80
-
81
-
82
-
83
-
84
-
85
-
86
-
87
-
88
-
89
-
90
-
91
-
92
-
93
-
94
-
95
-
96
-
97
-
98
 |
 |
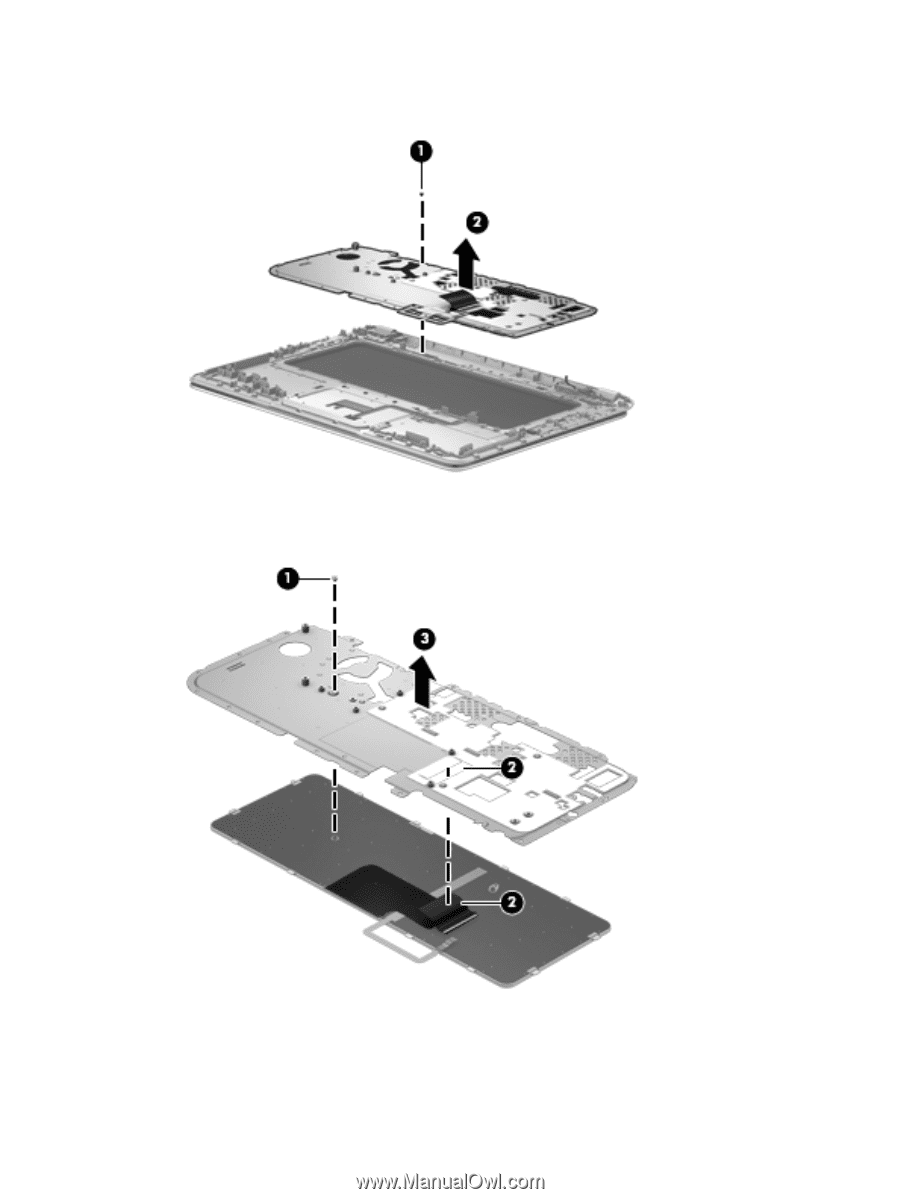
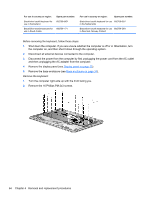
3.
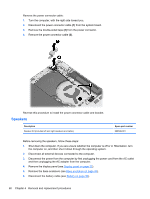
Remove the single screw
(1)
, and then release the keyboard and keyboard bracket from the top
cover
(2)
.
4.
Remove the 1 Phillips PM 2.5x3 screw securing the keyboard to the bracket
(1)
, disconnect the
keyboard cable
(2)
(pushing it through the bracket), and then remove the keyboard from the
bracket
(3)
.
Reverse this procedure to install the keyboard.
Component replacement procedures
65