HP F2105 User's Guide - HP f2105 LCD Monitor - Page 21
Setting Up the Monitor, Before You Begin - resolution
 |
UPC - 829160829180
View all HP F2105 manuals
Add to My Manuals
Save this manual to your list of manuals |
Page 21 highlights
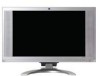
3 Setting Up the Monitor Before You Begin 1. Unpack the monitor. Make sure all contents are included. Store the box and packing foam. 2. Ensure that the power is turned off to the monitor, PC system, and other attached devices (monitor ships in off position). 3. Determine the video cable or cables that you want to connect from the PC video card outputs to the VGA and DVI-D (select models only) connectors on the monitor. You can connect one or both cables. ❏ VGA cable: Standard VGA 15-pin cable. ❏ DVI-D cable (select models only): For digital operation, use the DVI-D-to-DVI-D video cable provided. The DVI-D cable supplied with this monitor is for digital-to-digital connection only. Your PC must have a DVI-compatible graphics card installed for use with this cable. Your DVI-compatible graphics card may not support the optimal monitor resolution. Refer to the documentation that came with your graphics card. 4. Determine if the monitor is to be desktop-mounted or wall-mounted. See "Installing the Monitor" in this chapter. 5. Prepare a flat area to use when assembling the monitor. You may need a flat, soft, protected area for placing the monitor screen-down while preparing it for wall mounting. 6. You need a Phillips head screwdriver for preparing the monitor for wall mounting. You may need a straight-slot screwdriver to secure some cables. User's Guide 3-1
-
 1
1 -
2
-
3
-
4
-
5
-
6
-
7
-
8
-
9
-
10
-
11
-
12
-
13
-
14
-
15
-
 16
16 -
 17
17 -
 18
18 -
 19
19 -
 20
20 -
 21
21 -
 22
22 -
 23
23 -
 24
24 -
 25
25 -
 26
26 -
27
-
28
-
29
-
30
-
31
-
32
-
33
-
34
-
35
-
36
-
37
-
38
-
39
-
40
-
41
-
42
-
43
-
44
-
45
-
46
-
47
-
48
-
49
-
50
-
51
-
52
-
53
-
54
-
55
-
56
-
57
-
58
-
59
-
60
-
61
-
62
-
63
-
64
-
65
-
66
-
67
-
68
-
69
-
70
-
71
-
72
-
73
-
74
 |
 |
