HP F2105 User's Guide - HP f2105 LCD Monitor - Page 54
Entering User Modes, Image Control, Factory Reset
 |
UPC - 829160829180
View all HP F2105 manuals
Add to My Manuals
Save this manual to your list of manuals |
Page 54 highlights
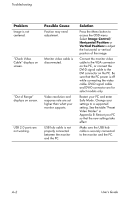
Operating the Monitor ■ Clock Phase - Increase or decrease the value to minimize video distortion or video jitter. Use these controls only when the auto-adjustment function does not provide a satisfactory monitor image in analog mode. To obtain the best results: 1. Allow the monitor to warm up for 20 minutes before adjusting. 2. Display the adjustment pattern application provided on the CD. 3. Access the Advanced Menu OSD; select Image Control. 4. Set the main Clock correctly first, because the Clock Phase settings depend on the main Clock setting. ❏ When adjusting the Clock and Clock Phase values, if the monitor images become distorted, continue adjusting the values until the distortion disappears. To restore the factory settings, access the Advanced Menu OSD, select Factory Reset, and then select Yes. Entering User Modes The video controller signal may occasionally require a custom user mode if you are not using a standard graphics adapter or preset mode. In this condition, you may need to create a user mode. You can use the OSD to: ■ Create a user-defined mode with custom monitor screen parameters. ■ Readjust the parameters of any user mode. ■ Save them in memory. The monitor automatically stores the new setting, then recognizes the new mode just as it does a preset mode. Ten user modes can be entered and stored, in addition to the factory preset modes. See the table "Preset Video Modes" in Appendix B. 4-18 User's Guide
-
 1
1 -
2
-
3
-
4
-
5
-
6
-
7
-
8
-
9
-
10
-
11
-
12
-
13
-
14
-
15
-
16
-
17
-
18
-
19
-
20
-
21
-
22
-
23
-
24
-
25
-
26
-
27
-
28
-
29
-
30
-
31
-
32
-
33
-
34
-
35
-
36
-
37
-
38
-
39
-
40
-
41
-
42
-
43
-
44
-
45
-
46
-
47
-
48
-
 49
49 -
 50
50 -
 51
51 -
 52
52 -
 53
53 -
 54
54 -
 55
55 -
 56
56 -
 57
57 -
 58
58 -
 59
59 -
60
-
61
-
62
-
63
-
64
-
65
-
66
-
67
-
68
-
69
-
70
-
71
-
72
-
73
-
74
 |
 |
