HP Integrity BL60p User Service Guide, Second Edition - HP Integrity BL60p Ser - Page 164
Accessing EFI or OS from iLO MP
 |
View all HP Integrity BL60p manuals
Add to My Manuals
Save this manual to your list of manuals |
Page 164 highlights
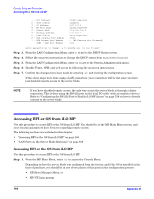
Console Setup and Connection Accessing EFI or OS from iLO MP - - MAC Address D - DHCP status I - IP Address M - MP Host Name S - Subnet Mask G - Gateway Address L - Link Status W - Web Console Port Number - - SSH Access Port Number - - IPMI / LAN Port Number :0x00110aa50058 :Enabled :127.0.0.1 :mp00110aa50058 :255.255.255.0 :127.0.0.1 :Auto Negotiate :2023 :- (MP Feature Not Licensed) :623 Enter parameter(s) to change. A to modify All. Or (Q) to Quit: Step 3. From the LAN Configuration Menu, enter D to get to the DHCP Status screen. Step 4. Follow the onscreen instructions to change the DHCP status from Enabled to Disabled. Step 5. From the LAN Configuration Menu, enter SA to get to the System Administration menu. Step 6. Disable Telnet, SSH, and web access by following the on-screen instructions. Step 7. Confirm the changes have been made by entering LC and viewing the configuration screen. If the above steps were done using a LAN connection, your connection will be lost since you have just disabled remote access to the server blade. NOTE If you have disabled remote access, the only way access the server blade is through a direct connection. This is done using the RS-232 port on the local I/O cable (with an emulator device). Refer to "Configuring the RS-232 Port to Enable iLO MP Access" on page 158 on how to directly connect to the server blade. Accessing EFI or OS from iLO MP Use this procedure to access EFI or the OS from iLO MP. You should be at the MP Main Menu screen, and your security parameters have been set regarding remote access. The following sections are included in this chapter: • "Accessing EFI or the OS from iLO MP" on page 164 • "LAN Ports on the Server Blade Enclosure" on page 166 Accessing EFI or the OS from iLO MP Use this procedure to access EFI or the OS from iLO MP. Step 1. From the MP Main Menu, enter CO to access the Console Menu. Depending on how the server blade was configured from the factory, and if the OS is installed at the time of purchase, you should be in one of two places at this point in the configuration process: • EFI Boot Manager Menu; or • HP-UX login prompt 164 Appendix D
-
 1
1 -
2
-
3
-
4
-
5
-
6
-
7
-
8
-
9
-
10
-
11
-
12
-
13
-
14
-
15
-
16
-
17
-
18
-
19
-
20
-
21
-
22
-
23
-
24
-
25
-
26
-
27
-
28
-
29
-
30
-
31
-
32
-
33
-
34
-
35
-
36
-
37
-
38
-
39
-
40
-
41
-
42
-
43
-
44
-
45
-
46
-
47
-
48
-
49
-
50
-
51
-
52
-
53
-
54
-
55
-
56
-
57
-
58
-
59
-
60
-
61
-
62
-
63
-
64
-
65
-
66
-
67
-
68
-
69
-
70
-
71
-
72
-
73
-
74
-
75
-
76
-
77
-
78
-
79
-
80
-
81
-
82
-
83
-
84
-
85
-
86
-
87
-
88
-
89
-
90
-
91
-
92
-
93
-
94
-
95
-
96
-
97
-
98
-
99
-
100
-
101
-
102
-
103
-
104
-
105
-
106
-
107
-
108
-
109
-
110
-
111
-
112
-
113
-
114
-
115
-
116
-
117
-
118
-
119
-
120
-
121
-
122
-
123
-
124
-
125
-
126
-
127
-
128
-
129
-
130
-
131
-
132
-
133
-
134
-
135
-
136
-
137
-
138
-
139
-
140
-
141
-
142
-
143
-
144
-
145
-
146
-
147
-
148
-
149
-
150
-
151
-
152
-
153
-
154
-
155
-
156
-
157
-
158
-
 159
159 -
 160
160 -
 161
161 -
 162
162 -
 163
163 -
 164
164 -
 165
165 -
 166
166 -
 167
167 -
 168
168 -
 169
169 -
170
-
171
-
172
 |
 |