HP Integrity rx1600 Operation and Maintenance - HP Integrity rx1600 - Page 103
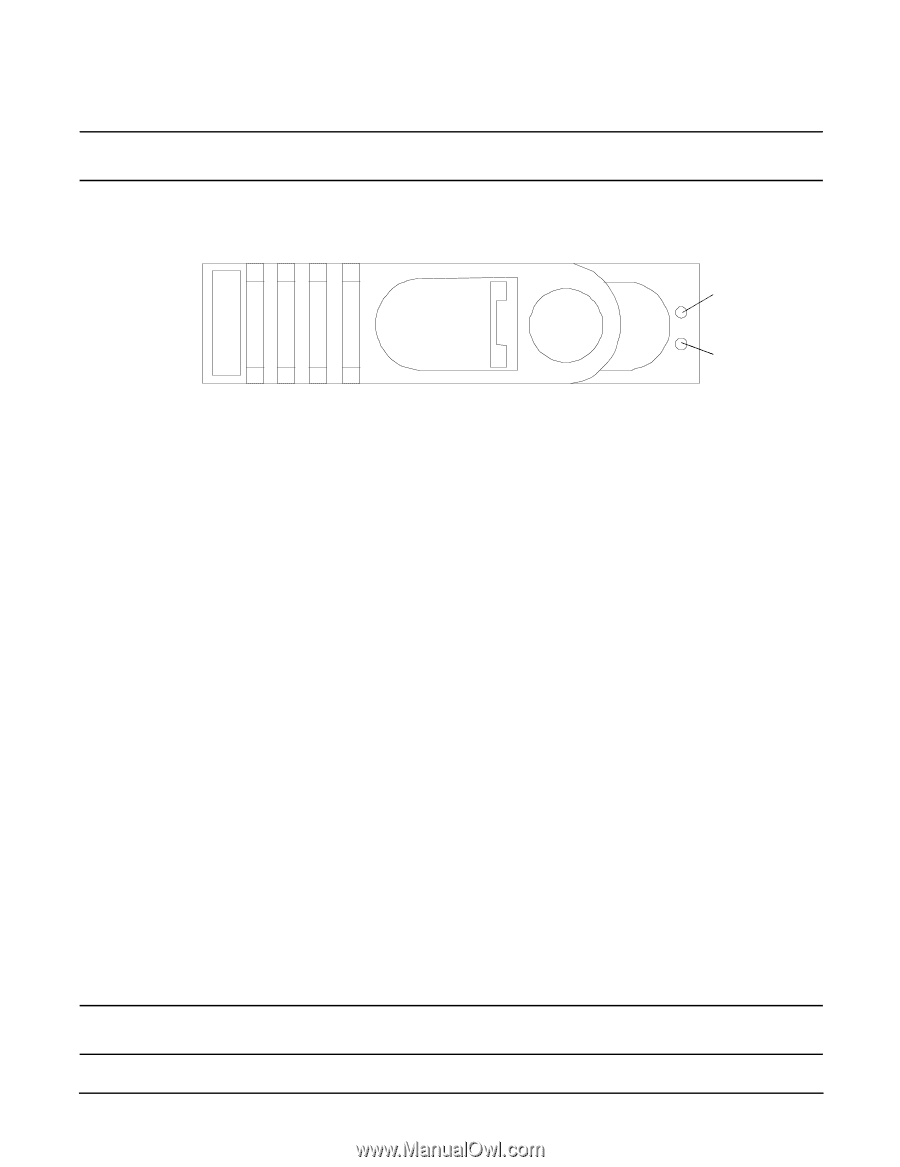
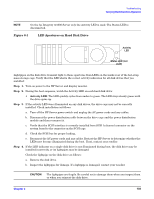
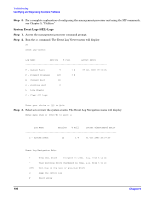
LED Apertures on Hard Disk Drive, Step 1., Activity LED
 |
View all HP Integrity rx1600 manuals
Add to My Manuals
Save this manual to your list of manuals |
Page 103 highlights
Troubleshooting Verifying Hard Disk Drive Operation NOTE On the hp Integrity rx1600 Server only the Activity LED is used. The Status LED is disconnected. Figure 6-1 LED Apertures on Hard Disk Drive Activity LED Status LED (not used) Lightpipes on the disk drive transmit light to these apertures from LEDs on the inside rear of the hot-swap mass storage cage. Verify that the LED shows the correct activity indication for all disk drives that you installed: Step 1. Turn on power to the HP Server and display monitor. Step 2. During the boot sequence, watch the Activity LED on each hard disk drive: • Activity LED: The LED quickly cycles from amber to green. The LED stays steady green until the drive spins up. Step 3. If the activity LED were illuminated on any disk drives, the drive cage may not be correctly installed. Check installation as follows: a. Turn off the HP Server power switch and unplug the AC power cords and any cables. b. Disconnect the power distribution cable between the drive cage and the power distribution module and then reconnect it. c. Verify that the SCSI interface is correctly installed from SCSI A channel connector on the system board to the connector on the SCSI cage. d. Check the SCSI bus for proper loading, e. Reconnect the AC power cords and any cables. Restart the HP Server to determine whether the LEDs now become illuminated during the boot. If not, contact your reseller. Step 4. If the LED indicator on a single disk drive is not illuminated during boot, the disk drive may be installed incorrectly, or its lightpipes may be damaged. Check the lightpipe on the disk drive as follows: a. Remove the disk drive. b. Inspect the lightpipes for damage. If a lightpipe is damaged, contact your reseller. CAUTION The lightpipes are fragile. Be careful not to damage them when you inspect them or when you reinsert the disk drive. Chapter 6 103
-
 1
1 -
2
-
3
-
4
-
5
-
6
-
7
-
8
-
9
-
10
-
11
-
12
-
13
-
14
-
15
-
16
-
17
-
18
-
19
-
20
-
21
-
22
-
23
-
24
-
25
-
26
-
27
-
28
-
29
-
30
-
31
-
32
-
33
-
34
-
35
-
36
-
37
-
38
-
39
-
40
-
41
-
42
-
43
-
44
-
45
-
46
-
47
-
48
-
49
-
50
-
51
-
52
-
53
-
54
-
55
-
56
-
57
-
58
-
59
-
60
-
61
-
62
-
63
-
64
-
65
-
66
-
67
-
68
-
69
-
70
-
71
-
72
-
73
-
74
-
75
-
76
-
77
-
78
-
79
-
80
-
81
-
82
-
83
-
84
-
85
-
86
-
87
-
88
-
89
-
90
-
91
-
92
-
93
-
94
-
95
-
96
-
97
-
 98
98 -
 99
99 -
 100
100 -
 101
101 -
 102
102 -
 103
103 -
 104
104 -
 105
105 -
 106
106 -
 107
107 -
 108
108 -
109
-
110
-
111
-
112
-
113
-
114
-
115
-
116
-
117
-
118
-
119
-
120
-
121
-
122
-
123
-
124
-
125
-
126
-
127
-
128
-
129
-
130
-
131
-
132
-
133
-
134
-
135
-
136
-
137
-
138
-
139
-
140
-
141
-
142
-
143
-
144
-
145
-
146
-
147
-
148
-
149
-
150
-
151
-
152
-
153
-
154
-
155
-
156
-
157
-
158
-
159
-
160
-
161
-
162
-
163
-
164
-
165
-
166
-
167
-
168
-
169
-
170
-
171
-
172
-
173
-
174
-
175
-
176
-
177
-
178
-
179
-
180
-
181
-
182
-
183
-
184
-
185
-
186
-
187
-
188
-
189
-
190
-
191
-
192
-
193
-
194
-
195
-
196
-
197
-
198
-
199
-
200
-
201
-
202
-
203
-
204
 |
 |