HP L2045w HP L2045w LCD Monitor User Guide - Page 19
WARNING, CAUTION, Adjusting the Height - adjust height
 |
View all HP L2045w manuals
Add to My Manuals
Save this manual to your list of manuals |
Page 19 highlights
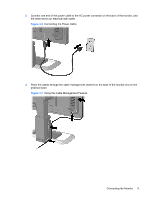
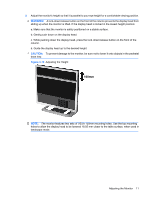
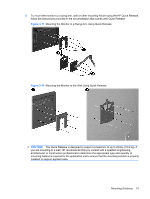
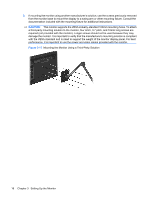
3. Adjust the monitor's height so that it is parallel to your eye height for a comfortable viewing position. WARNING! A lock-down/release button on the front of the column prevents the display head from sliding up when the monitor is lifted. If the display head is locked in the lowest height position: a. Make sure that the monitor is safely positioned on a stable surface. b. Gently push down on the display head. c. While pushing down the display head, press the lock-down/release button on the front of the column. d. Guide the display head up to the desired height. CAUTION: To prevent damage to the monitor, be sure not to lower it onto objects in the pedestal base tray. Figure 3-10 Adjusting the Height NOTE: The monitor features two sets of VESA 100mm mounting holes. Use the top mounting holes to allow the display head to be lowered 18.05 mm closer to the table surface, when used in landscape mode. Adjusting the Monitor 11
-
 1
1 -
2
-
3
-
4
-
5
-
6
-
7
-
8
-
9
-
10
-
11
-
12
-
13
-
 14
14 -
 15
15 -
 16
16 -
 17
17 -
 18
18 -
 19
19 -
 20
20 -
 21
21 -
 22
22 -
 23
23 -
 24
24 -
25
-
26
-
27
-
28
-
29
-
30
-
31
-
32
-
33
-
34
-
35
-
36
-
37
-
38
-
39
-
40
-
41
-
42
-
43
-
44
-
45
-
46
-
47
-
48
-
49
 |
 |
