HP LH4r HP Netserver LP 1000r User Guide, Chapter 13 Update - Page 2
Tools Required, Rack Configuration Tools
 |
View all HP LH4r manuals
Add to My Manuals
Save this manual to your list of manuals |
Page 2 highlights
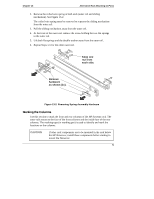
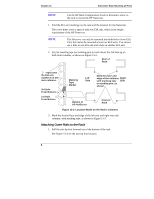
Chapter 13 Alternative Rack Mounting (4-Post) Before mounting the Netserver, determine the Netserver's location in the rack relative to other rack components. Proper placement is vital both for safety and operating efficiency. For more information, refer to "Rack Configuration Tools" later in this chapter. NOTE If the HP Netserver is completely configured by the vendor before delivery to the customer, then mounting the HP Netserver in the rack may be the final step in the installation procedure. If the vendor configures the HP Netserver at the customer's site, installation of the network operating system and other software may occur after the HP Netserver is mounted in the rack. CAUTION If other rack components are to be mounted in the rack below the HP Netserver, install those components before starting to mount the Netserver. Tools Required This rack mounting kit is provided as a tool-less assembly, but does need a nut drive or wrench to release the spring mechanism after shipping. • Nut driver (10-mm) or wrench (removing spring assembly) • Phillips screwdriver (removing spring assembly) • Masking tape or marking pen Rack Configuration Tools The HP rack configuration tools, including white papers, are available on worldwide web at HP's web site. Enter the following URL in your browser: http://www.hp.com/netserver At the Web site, search for "configuration tools" and "high density rack solutions," specifically Rack Assistant, Rack Configuration, Order Assistant, and HP Netserver High Density Rack Solutions Overview (LP 1000r and LP 2000r). You can read about the tools or download copies for installation. These tools can be used to plan a rack configuration for the components in your system. The white papers, specifically HP Netserver High Density Rack Solutions Overview (LP 1000r and LP 2000r), provide rack information for HP Netservers 2
-
 1
1 -
 2
2 -
 3
3 -
 4
4 -
 5
5 -
 6
6 -
 7
7 -
 8
8 -
9
-
10
-
11
-
12
-
13
 |
 |
