HP LH4r HP Netserver LP 1000r User Guide, Chapter 13 Update - Page 9
Attaching the Front Bezel, Mounting the HP Netserver
 |
View all HP LH4r manuals
Add to My Manuals
Save this manual to your list of manuals |
Page 9 highlights
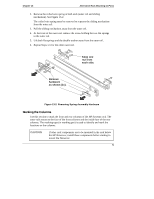
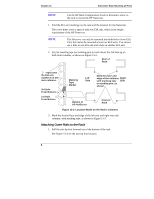
Chapter 13 Alternative Rack Mounting (4-Post) Figure 13-5. Mounting the HP Netserver 5. Slowly move the Netserver chassis into the outer-rail assemblies until the Netserver is completely in the rack. See Figure 13-5. The securing brackets on the front of the Netserver should stop the chassis from going all the way into the rack. 6. Secure the Netserver chassis to the rack with captive screws. Attaching the Front Bezel The front bezel attaches to the HP Netserver by pivoting on two pins at the bottom and grasping the top pins with spring latches. The middle pins force the bezel to pivot in or out, ensuring a rotating action. 1. Position the Bezel in front of the HP Netserver LP 1000r as shown in Figure 13-6. 2. Push in on the bottom to engage the pins, allowing it to rotate up. 3. Push the bezel in at the top to engage the spring latches. The spring latches should click when engaged. 9
-
 1
1 -
2
-
3
-
 4
4 -
 5
5 -
 6
6 -
 7
7 -
 8
8 -
 9
9 -
 10
10 -
 11
11 -
 12
12 -
 13
13
 |
 |
