HP LH4r HP Netserver LP 1000r User Guide, Chapter 13 Update - Page 4
Preparing the Rack, HP Netserver Rack Mount Parts List, Removing Spring Assemblies
 |
View all HP LH4r manuals
Add to My Manuals
Save this manual to your list of manuals |
Page 4 highlights
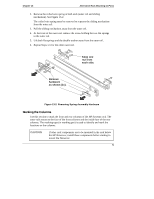
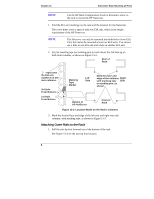
Chapter 13 Alternative Rack Mounting (4-Post) Preparing the Rack The outer-rail assemblies have spring assemblies that must be removed after shipment and the columns must be marked before mounting the outer-rail assemblies. Once the outer-rails are correctly mounted, then the HP Netserver LP 1000r can be installed into the rack. A template is not provided because the Netserver is exactly one EIA unit high and can only fit into one EIA unit, but not across two EIA units. NOTE The HP Netserver weighs 32 lbs. (14.5 kg.) fully loaded. It is not necessary to use two people when placing the Netserver into the rack, but it may be helpful. HP Netserver Rack Mount Parts List Ensure the rack-mounting kit provided with the HP Netserver contains the following parts: Table 13-1. Parts for Rack Mount Kit Quantity Description 2 Outer-rail assembly Removing Spring Assemblies The outer-rail assemblies are shipped with spring assemblies used on the newer HP System/E or System/U racks, but not used on the older HP System racks. The spring assemblies (coiled wire and flat spring) must be removed, before mounting the outer rails. The coiled spring assemblies on the outer-rails are compressed for shipping and held in place with two 10-mm nuts. These nuts must be removed along with the coiled spring to remove the rear spring assemblies, but two of the nuts must be kept to secure the rails to the rear columns of the rack. See Figure 13-2. 1. Turn both nuts on each rail counterclockwise (CCW) to release the rear spring assembly and remove the nuts. See Figure 13-2. Keep one nut from each outer rail to attach the rear of the outer rail to the rear column. 4
-
 1
1 -
 2
2 -
 3
3 -
 4
4 -
 5
5 -
 6
6 -
 7
7 -
 8
8 -
 9
9 -
 10
10 -
11
-
12
-
13
 |
 |
