HP LH4r HP Netserver LP 1000r User Guide, Chapter 13 Update - Page 5
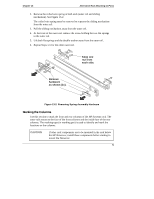
Marking the Columns, Remove, hardware, as shown 2x., Keep one, nut from, each side.
 |
View all HP LH4r manuals
Add to My Manuals
Save this manual to your list of manuals |
Page 5 highlights
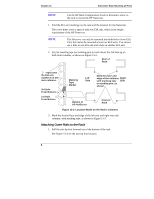
Chapter 13 Alternative Rack Mounting (4-Post) 2. Remove the coiled wire spring at both ends (outer rail and sliding mechanism). See Figure 13-2. The coiled wire spring must be removed to separate the sliding mechanism from the outer rail. 3. Pull the sliding mechanism away from the outer rail. 4. At the front of the outer rail, remove the screw holding the two flat springs to the outer rail. 5. Lift both flat springs and the double washer away from the outer rail. 6. Repeat Steps 1-5 for the other outer rail. Keep one nut from each side. Remove hardware as shown (2x). Figure 13-2. Removing Spring Assembly Hardware Marking the Columns Use this section to mark the front and rear columns of the HP Systems rack. The outer-rails mount to the face of the front columns and the inside face of the rear columns. The masking tape (or marking pen) is used to identify and mark the locations on the columns. CAUTION If other rack components are to be mounted in the rack below the HP Netserver, install those components before starting to mount the Netserver. 5
-
 1
1 -
 2
2 -
 3
3 -
 4
4 -
 5
5 -
 6
6 -
 7
7 -
 8
8 -
 9
9 -
 10
10 -
 11
11 -
12
-
13
 |
 |
