HP LH4r HP Netserver LXr 8000 to LXr 8500 Upgrade Guide - Page 42
Make sure that the retaining latches on top of the processor module are
 |
View all HP LH4r manuals
Add to My Manuals
Save this manual to your list of manuals |
Page 42 highlights
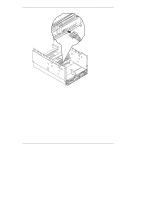
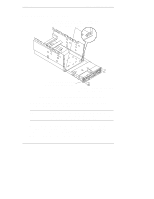
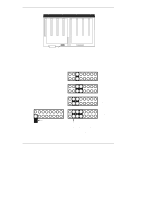
Chapter 4 Preparing to Assemble the LXr 8500 2. Place the processor tray for the LXr 8000 on a table next to the LXr 8500. NOTE Placing the two processor trays next to each other will reduce the chance of damaging a processor due to static electricity when you move the processor from the old tray to the new tray. 3. Open and remove the processor cage covers on both the LXr 8000 and the LXr 8500 processor cages. Loosen the captive screws that hold down the cover of each processor cage. Swing open each cover until it points straight up, then lift it out. 4. Remove just one processor module from the LXr 8000 and insert it into the LXr 8500 as follows (see Figure 4-2): a. Open the retaining latches of one processor module, lift to remove the module, then turn it 180o. b. Make sure that the retaining latches on top of the processor module are open (pointing straight up). Slide the processor module into the one empty slot (slot 1) in the processor cage, and rotate the retaining latches into the closed position. c. Do not install additional processor modules or remove any terminators at this time. You will finish installing processors after your preliminary hardware verification, discussed in Chapter 6. d. Check that all terminators are firmly place by pressing down on each one and verifying that the retaining latches are closed. 36
-
 1
1 -
2
-
3
-
4
-
5
-
6
-
7
-
8
-
9
-
10
-
11
-
12
-
13
-
14
-
15
-
16
-
17
-
18
-
19
-
20
-
21
-
22
-
23
-
24
-
25
-
26
-
27
-
28
-
29
-
30
-
31
-
32
-
33
-
34
-
35
-
36
-
 37
37 -
 38
38 -
 39
39 -
 40
40 -
 41
41 -
 42
42 -
 43
43 -
 44
44 -
 45
45 -
 46
46 -
 47
47 -
48
-
49
-
50
-
51
-
52
-
53
-
54
-
55
-
56
-
57
-
58
-
59
-
60
-
61
-
62
-
63
-
64
-
65
-
66
-
67
-
68
-
69
-
70
-
71
-
72
-
73
-
74
-
75
-
76
-
77
-
78
-
79
-
80
-
81
-
82
-
83
-
84
-
85
-
86
-
87
-
88
-
89
-
90
-
91
-
92
-
93
-
94
-
95
-
96
-
97
 |
 |
